FAQ
Some of us may be unfamiliar with the many tech terms that spruce up every so often. Firewall can also be a term that not many are familiar with.
According to a study by National Cyber Security Alliance, only 4 percent of Americans say they understand firewalls "completely", while more than 44 percent don't understand firewalls at all - or know if they have one enabled on their PC. So for those who feel unsure, keep reading to find out why a firewall is a necessary part of your online defense.
If your PC is connected to the Internet, you are a potential target to an array of cyber threats, such as hackers, keyloggers, and Trojans that attack through unpatched security holes. This means that, as you shop and bank online, you are vulnerable to identity theft and other malicious attacks.
What is a firewall?
A firewall is a software program or piece of hardware that helps screen out hackers, viruses, worms etc and works as a barrier, or a shield, between your PC and cyber space. Your computer is more susceptible to being attacked when you are accesing your internet via your PC, you can restrict outside access to your computer and the information on it with a firewall.
What are the types of firewalls out there?
Firewalls can be either hardware or software but the ideal firewall configuration will consist of both. In addition to limiting access to your computer and network, a firewall is also useful for allowing remote access to a private network through secure authentication certificates and logins.
Hardware firewalls can be purchased as a stand-alone product but are also typically found in broadband routers, and should be considered an important part of your system and network set-up. Most hardware firewalls will have a minimum of four network ports to connect other computers, but for larger networks, business networking firewall solutions are available.
Software firewalls are installed on your computer (like any software) and you can customize it; allowing you some control over its function and protection features. A software firewall will protect your computer from outside attempts to control or gain access your computer.
How does a firewall work and protect my computer?
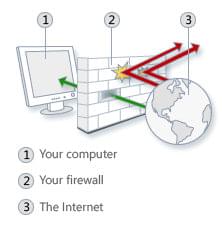
When you are connected to the Internet, you are constantly sending and receiving information in small units called packets. A firewall filters these packets to see if they meet certain criteria set by a series of rules, and thereafter blocks or allows the data. This way, hackers cannot get inside and steal information such as bank account numbers and passwords from you.
Basic firewalls such as the one included in your Windows, only monitor incoming traffic by default. This may give you a false sense of security. Keep in mind, outgoing traffic, with your credit card information, bank accounts, and social security number is not protected. A good firewall will monitor traffic in both directions. That is, both your incoming data and your outgoing data, keeping your private information safe. In addition to preventing unauthorized access to your PC, it also makes your computer invisible when you’re online, helping to prevent attempted intrusions in the first place.
Most sophisticated firewalls also include a feature that continuously updates the list of known good and known malicious applications. This way, the amount of questions relating to Internet access is minimized and your computer protection is always up-to-date.
Also important to keep in mind: although a firewall provides critical protection to keep your PC safe from unauthorized access, it cannot remove malware from a system that has already been infected. Due to that, a firewall should be used in combination with other proactive measures, like anti-malware software, to strengthen your resistance to attacks.
Today's threats are varied, sophisticated, and continue to adapt in order to get past your defenses. And that means that going online without essential protection in place on your computer is no longer an option.
The best ways to stay secure online are to prepare your PC with the right tools, and to use caution and common sense whenever you use the Internet. Updated spyware and virus protection with real-time monitoring are important tools in keeping spyware and malware from infecting your computer. An up-to-date firewall is another security must-have. These three elements provide fundamental security to your PC, and are essential to protect your information and your privacy.
What exactly are these tools and why are they necessary?
Anti-spyware software. Spyware attaches itself to individual computers to perform functions like monitoring Internet navigation and stealing information. Spyware can track your personal data and then send it to cyber criminals. Anti-spyware software can protect your computer by providing real-time protection against malware, spyware, and adware installations, as well as by detecting and removing such programs that are already installed on your computer.
Anti-virus software. A virus is code that recursively replicates a possibly evolved copy of itself. Viruses use computers to spread from one to another. They often perform a function that can erase files and processes from your computer. Anti-virus software can protect your computer from a range of cyber threats like viruses, worms, rootkits, and phishing attacks. The software keeps you protected by scanning files to look for known viruses, and by using what is known as heuristics to identify suspicious behavior which may indicate a threat.
Firewall. A firewall works as a barrier between your PC and cyber space. When you are connected to the Internet, you are constantly sending and receiving information in small units called packets. The firewall filters these packets to see if they meet certain criteria set by a series of rules, and thereafter blocks or allows the data. A firewall provides critical protection to keep your PC safe from unauthorized access, yet it cannot remove malware from a system that has already been infected; therefore it should be used in conjunction with anti-spyware and anti-virus software.
At adaware, it is our mission to provide the solutions needed to protect against today's varied threat landscape. To help you fight the malware battle, the adaware product lineup includes the following stand-alone and combined tools:
Adaware Antivirus Free
Combining our legendary anti-spyware with a powerful antivirus, adaware antivirus free enhances them with real-time protection, download protection and continuously updated filters against malicious URLs, providing top-of-the-line anti-malware protection for the casual computer user.
Adaware antivirus personal
adaware antivirus personal provides a complete set of anti-phishing features and real-time web-filtering technology that safeguards your PC against phishing attacks and online scams, giving you the confidence you need to shop and bank online.
Adaware Antivirus Pro
Complete line-of-defense against the most extreme forms of malware and cyber threats, adaware antivirus pro provides the most advanced anti-spyware and antivirus detection and threat blocking algorithms, complemented with a powerful two-way firewall, web filters against phishing attacks and real-time email protection.
Adaware Antivirus Total
Our most comprehensive line of defense, adaware antivirus total provides multiple layers of protection for complete PC security, including antivirus and anti-spyware, firewall, anti-phishing, email protection, parental control and more, as well as a complete set of data security features like file encryption and digital shredder.
For more information on additional tools to maintain your PC's health and security, see our articles: Tuning Up Your Computer and Keep Your Information Under Your Control.
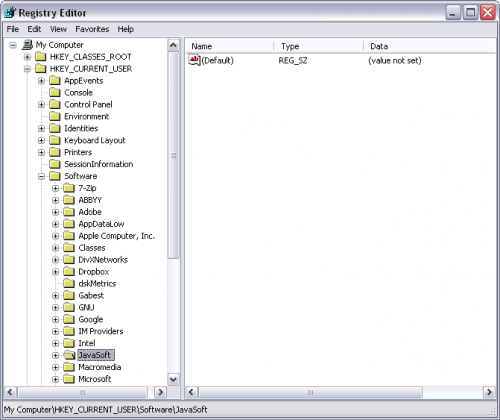
The system registry is a database of essential file references to applications and utilities. Its structure is hierarchical. The registry is structured with nodes of information that contain keys and sub-keys.
To access the System Registry is quite easy.
Do not make any changes until you have done a backup of the Registry. If any incorrect change, you may not boot your OS.
To start working with the system registry, proceed through the following steps:
Click Start --> Type regedit --> click OK
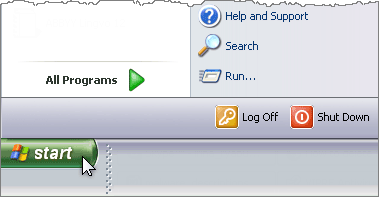
The Registry Editor window displays.
Sometimes, to clean your infected computer and eliminate the consequences of the infection, it is necessary to make changes in the Windows system registry. When editing the system registry, it is recommended to strictly follow the adaware Expert’s guidelines.
Temporary Internet Files is a folder on Microsoft Windows which contains Web page content that is stored on your hard disk. Internet Explorer and other web browsers uses this directory to cache pages and other multimedia content, such as video and audio files, from websites you visit. This feature improves network performance allowing such websites to load more quickly the next time you visit them.
To clean the Temporary Internet Files folder, proceed through the steps listed below:
1- Open either Internet Explorer (8.0) or the Control Panel.
2- With Internet Explorer, click the Tools menu and then click Internet Options...
With Control Panel, double-click Internet Options.
In either case, the Internet Properties window appears.
3- On the General tab, click Delete under Browsing History.
4- With the Delete Browsing History dialog box, select the Temporary Internet Files check box, and then click Delete.
5- Click OK.
Virtually everyone with a computer has now heard of spyware, but where and when did it rear its ugly head for the first time? Here is a little history...
The word 'spyware' was used for the first time publicly in October 1995. It popped up on Usenet (a distributed Internet discussion system in which users post e-mail like messages) in an article aimed at Microsoft's business model. In the years that followed though, spyware often referred to 'snoop equipment' such as tiny, hidden cameras. It re-appeared in a news release for a personal firewall product in early 2000, marking the beginning of the modern usage of the word.
In 1999, Steve Gibson of Gibson Research detected advertising software on his computer and suspected it was actually stealing his confidential information. The so-called adware had been covertly installed and was difficult to remove, so he decided to counter-attack and develop the first ever anti-spyware program, OptOut.
That's where Lavasoft (now adaware) picked up and Gibson left off. He went on to other projects and Lavasoft became a pioneer in the anti-spyware industry with its signature free, downloadable product Ad-Aware (now adaware antivirus). Lavasoft's paid products soon followed and it is now the anti-spyware provider for 300 million computer users worldwide today.
Let's be honest, no one wants to own a computer that is infected with malicious programs. Therefore, it is imperative to practice safe computing habits. You can avoid most malware just by staying away from a few common traps.
Cybercriminals are constantly trying to find holes or vulnerabilities to exploit, and new threats are emerging every day on the web. To stay protected, it is important to have the latest version of the software you are using.
Unfortunately, every so often malware get beyond our defenses even though we are careful. Maybe our anti-virus software is out of date or has been compromised by a particularly clever bit of code. Perhaps we clicked on a link by accident and activated a virus. Or someone else used our computer and downloaded some malware by mistake.
5 symptoms that your computer is infected with malware:
1. Your computer is running extremely slow.
This might be a symptom of an infection by a malware. If your computer has been infected by a virus, worm or Trojan, they could be running tasks that take up a lot of resources making your computer system run more slowly than usual. If you are not running a resource-heavy application but your computer is very slow, you might have a computer virus.
2. Beware of pop-ups!
If you encounter alarming pop-up messages while surfing the internet, claiming a virus has been detected on your computer and that you should download software to get rid of it. Watch out! These forms of communications are often scams to trick you into downloading software that can jeopardize the safety of your computer. If these messages did not come from your own anti-virus or anti-spyware applications, don't trust it! There is either spyware on the computer or it has been infected by a bogus antivirus (also called as a "rogue").
3. Your computer has gone unstable.
That is another sign that something is wrong with your computer. Most malware messes around with important files that halt your computer running properly. That could cause your computer to crash. If your computer crashes when you try to run a specific application or open a particular file that tells you that something has corrupted the data. It could be malware.
4. Your Antivirus and firewall protection is unexpectedly disabled.
This is yet another common characteristic that your computer may be infected. If all of your security components such as your antivirus and firewall have automatically been disabled without your consent, it is most likely a malware has deactivated your antivirus protection. For that reason, you should continuously check that your antivirus is working and running at full protection.
5. Unfamiliar and peculiar error messages.
If you are continuously getting error messages indicating that your programs won't run or your files won't open, it might be another sign of infection.
Other possible indicators that suggest something is wrong with your computer include:
- Strange messages indicating that you can't access certain drives on your computer.
- Hardware such as USB keys and printers are not responding to commands.
- File sizes are fluctuating even if you aren't accessing those files.
According to a study by NCSA Cyber Security, only 4% of Americans say they understand firewalls "completely", while more than 44% don't understand firewalls at all - or know if they have one enabled on their PC. So for those of you who feel a little unsure - below is a brief overview of why you might need a firewall.
If your PC is connected to the Internet, you are a potential target to an array of cyber threats, such as hackers, keyloggers, and Trojans that attack through unpatched security holes. This means that if you, like most people shop and bank online, are vulnerable to identity theft and other malicious attacks.
A firewall works as a barrier, or a shield, between your PC and cyber space. When you are connected to the Internet, you are constantly sending and receiving information in small units called packets. The firewall filters these packets to see if they meet certain criteria set by a series of rules, and thereafter blocks or allows the data. This way, hackers cannot get inside and steal information such as bank account numbers and passwords from you.
Basic firewalls such as the one included in Windows XP, only monitor incoming traffic by default. This may give you a false sense of security. Keep in mind, outgoing traffic, with your credit card information, bank accounts, and social security number is not protected. A good firewall will monitor traffic in both directions. That is, both your incoming data and your outgoing data, keeping your private information safe. In addition to preventing unauthorized access to your PC, it also makes your PC invisible when you're online, helping prevent attempted intrusions in the first place.
Most sophisticated firewalls also include a feature that continuously updates the list of known good and known malicious applications. This way, the amount of questions relating to Internet access is minimized and your computer protection is always up-to-date.
Although a firewall provides critical protection to keep your PC safe from unauthorized access, it cannot remove malware from a system that has already been infected. Therefore, a firewall should be used in conjunction with other proactive measures, such as anti-malware software, to strengthen your resistance to attacks.

Some of us may be unfamiliar with the many tech terms that spruce up every so often. Firewall can also be a term that not many are familiar with.
According to a study by National Cyber Security Alliance, only 4 percent of Americans say they understand firewalls "completely", while more than 44 percent don’t understand firewalls at all - or know if they have one enabled on their PC. So for those who feel unsure, keep reading to find out why a firewall is a necessary part of your online defense.
If your PC is connected to the Internet, you are a potential target to an array of cyber threats, such as hackers, keyloggers, and Trojans that attack through unpatched security holes. This means that, as you shop and bank online, you are vulnerable to identity theft and other malicious attacks.
What is a firewall?
A firewall is a software program or piece of hardware that helps screen out hackers, viruses, worms etc and works as a barrier, or a shield, between your PC and cyber space. Your computer is more susceptible to being attacked when you are accesing your internet via your PC, you can restrict outside access to your computer and the information on it with a firewall.
What are the types of firewalls out there?
Firewalls can be either hardware or software but the ideal firewall configuration will consist of both. In addition to limiting access to your computer and network, a firewall is also useful for allowing remote access to a private network through secure authentication certificates and logins.
Hardware firewalls can be purchased as a stand-alone product but are also typically found in broadband routers, and should be considered an important part of your system and network set-up. Most hardware firewalls will have a minimum of four network ports to connect other computers, but for larger networks, business networking firewall solutions are available.
Software firewalls are installed on your computer (like any software) and you can customize it; allowing you some control over its function and protection features. A software firewall will protect your computer from outside attempts to control or gain access your computer.
How does a firewall work and protect my computer?
When you are connected to the Internet, you are constantly sending and receiving information in small units called packets. A firewall filters these packets to see if they meet certain criteria set by a series of rules, and thereafter blocks or allows the data. This way, hackers cannot get inside and steal information such as bank account numbers and passwords from you.
Basic firewalls such as the one included in your Windows, only monitor incoming traffic by default. This may give you a false sense of security. Keep in mind, outgoing traffic, with your credit card information, bank accounts, and social security number is not protected. A good firewall will monitor traffic in both directions. That is, both your incoming data and your outgoing data, keeping your private information safe. In addition to preventing unauthorized access to your PC, it also makes your computer invisible when you’re online, helping to prevent attempted intrusions in the first place.
Most sophisticated firewalls also include a feature that continuously updates the list of known good and known malicious applications. This way, the amount of questions relating to Internet access is minimized and your computer protection is always up-to-date.
Also important to keep in mind: although a firewall provides critical protection to keep your PC safe from unauthorized access, it cannot remove malware from a system that has already been infected. Due to that, a firewall should be used in combination with other proactive measures, like anti-malware software, to strengthen your resistance to attacks.
Don't have a firewall installed on your PC?
Look no further, adaware pro security is our complete line-of-defense against the most extreme forms of malware and cyber threats, packed with valuable features that includes a powerful two-way firewall.
Our two-way firewall complements and enhances the protection offered by your typical router and provides more robust security than the built-in Microsoft Windows Firewall (they only check for incoming data) by monitoring which applications are attempting to send data out (outgoing traffic). In simpler terms, what it does is block hackers from getting into your system to steal important information.
According to a study by NCSA Cyber Security, only 4% of Americans say they understand firewalls "completely", while more than 44% don't understand firewalls at all - or know if they have one enabled on their PC. So for those of you who feel a little unsure - below is a brief overview of why you might need a firewall.
If your PC is connected to the Internet, you are a potential target to an array of cyber threats, such as hackers, keyloggers, and Trojans that attack through unpatched security holes. This means that if you, like most people shop and bank online, are vulnerable to identity theft and other malicious attacks.
A firewall works as a barrier, or a shield, between your PC and cyber space. When you are connected to the Internet, you are constantly sending and receiving information in small units called packets. The firewall filters these packets to see if they meet certain criteria set by a series of rules, and thereafter blocks or allows the data. This way, hackers cannot get inside and steal information such as bank account numbers and passwords from you.
Basic firewalls such as the one included in Windows XP, only monitor incoming traffic by default. This may give you a false sense of security. Keep in mind, outgoing traffic, with your credit card information, bank accounts, and social security number is not protected. A good firewall will monitor traffic in both directions. That is, both your incoming data and your outgoing data, keeping your private information safe. In addition to preventing unauthorized access to your PC, it also makes your PC invisible when you're online, helping prevent attempted intrusions in the first place.
Most sophisticated firewalls also include a feature that continuously updates the list of known good and known malicious applications. This way, the amount of questions relating to Internet access is minimized and your computer protection is always up-to-date.
Although a firewall provides critical protection to keep your PC safe from unauthorized access, it cannot remove malware from a system that has already been infected. Therefore, a firewall should be used in conjunction with other proactive measures, such as anti-malware software, to strengthen your resistance to attacks.
The Task Manager provides detailed information about computer performance and running applications, processes and CPU usage, commit charge and memory information, network activity and statistics, logged-in users, and system services.
You can use the Task Manager to end a process.
To open the Task Manager, do one of the following:
right-click the taskbar and then click Task Manager

– oder –
on the keyboard, press CTRL+ALT+DEL or CTRL+SHIFT+ESC
The Task Manager opens with the Processes tab.
With the window displayed, select a process you want to end and click the End Process button.
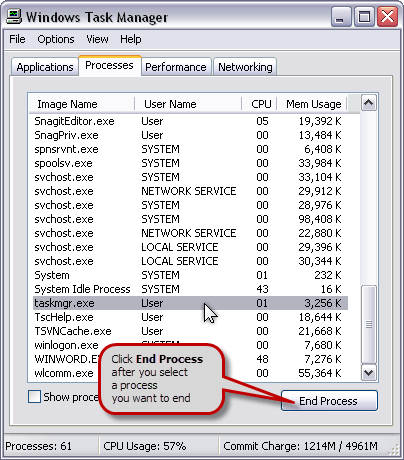
Note: Be careful when ending a process. If you close a program, you lose unsaved data. If you end a system service, some part of the system might not function properly.
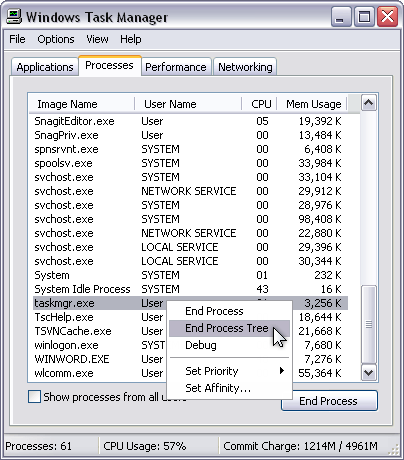
If you want to end a process and all processes which are created by it, on the Processes tab, right-click the process you want to end, and then click End Process Tree.
If you have any questions about an adaware product or experiencing some problems while using them, there are several online resources that can help you find prompt and effective answers. Here are your options:
Support for all users
The Support section of adaware.com has extensive information to help you install, use or repair our products. In this section, you will have the following ressources:
Fix my PC: If you're struggling with an unresponsive computer or suspect you have a virus, the tools found in Fix my PC are designed to help you.
FAQ: We've compiled a list of answers to the most frequently asked questions about our products' features or how to use them, as well as other valuable information about the company and cybersecurity.
Support for adaware antivirus: All the information you need to get adaware antivirus working for you. Some topics covered here are how to install & activate the software, how to repair or uninstall, or submitting a tech support ticket.
Support for adaware ad block: Your ressource to get the best out of adaware ad block. Some of the topics covered in this section are about maximizing your usage of the product with guides on how to install, use and uninstall the software.
Forum: Your space for engaging the adaware community for product-related questions and best practices.
Product Manuals: Our user guides can help you get started and get the most out of our software.
Support for paid users
If you are a paid user, you have access to one-on-one technical support by phone. At the time of purchase, you should have received the necessary contact information in a confirmation email. If you've misplaced that information, login to your My adaware account.
At Adaware, we encourage users to browse the web with confidence. We give our users peace of mind by protecting them from any potential threats that they may encounter when doing so. Protecting you while you are surfing the web is only a part of the Adaware advantage. Along with this, we like to ensure that there is an uninterrupted communication between you and your world while doing so. Tired of using Bitdefender antivirus solutions? Try Adaware to see how we can protect you better than Bitdefender antivirus, free today.
Our adaware Antivirus offers seamless protection against the latest online security threats. Its Antivirus detection system automatically scans, blocks, and removes the latest threats before they can harm your computer. Antispyware protection safeguards your usernames, passwords, and personal information. Best of all, Adaware antivirus stays up-to-date and works in the background for a peaceful online experience.
1 - Confirm your version of adaware antivirus
You can confirm the version you have installed. The number before the first period is the numbered version of adaware antivirus you have installed. As an example if the number is 9.1.23.9987 then you have adaware antivirus 9 installed.
2 - Open adaware antivirus
3 - Click on the Settings icon in the navigation sidebar to access the App Management menu.

** If you need to change the version of adaware antivirus you should uninstall your current adaware antivirus before you install the new version.
4 - Download Your Version of adaware antivirus
The current version you'll find on the main site is adaware antivirus 12. Click here to download.
5 - Activate adaware antivirus
Once your new version of adaware antivirus is installed, you will need to sign in to activate your product. For instructions on how to activate it, click here.
Your adaware antivirus licenses are linked to your adaware account. When you make a purchase, your products are added to an account with the email address you used.
**Pro Tip: If you used a third-party like Facebook to create your adaware account, make sure to use the same email address of the third-party account when making a purchase.
If you don't already have an account, it will be created once the purchase is complete. You'll receive an email asking you to make a password.
Once you have your account credentials ready, it's time to activate adaware antivirus.
**Pro Tip: If you already have an adaware account and would prefer to use that one, you can merge the two accounts, click here to learn how.
When you purchase multiple products at once, they will all be added to the account linked to the purchase email. This will be the primary account that manages the products. Only the primary account can manage the account status of each product.
You can assign each license to any email address. They will receive an email asking them to create a password. They can then login with their credentials and start using adaware antivirus.
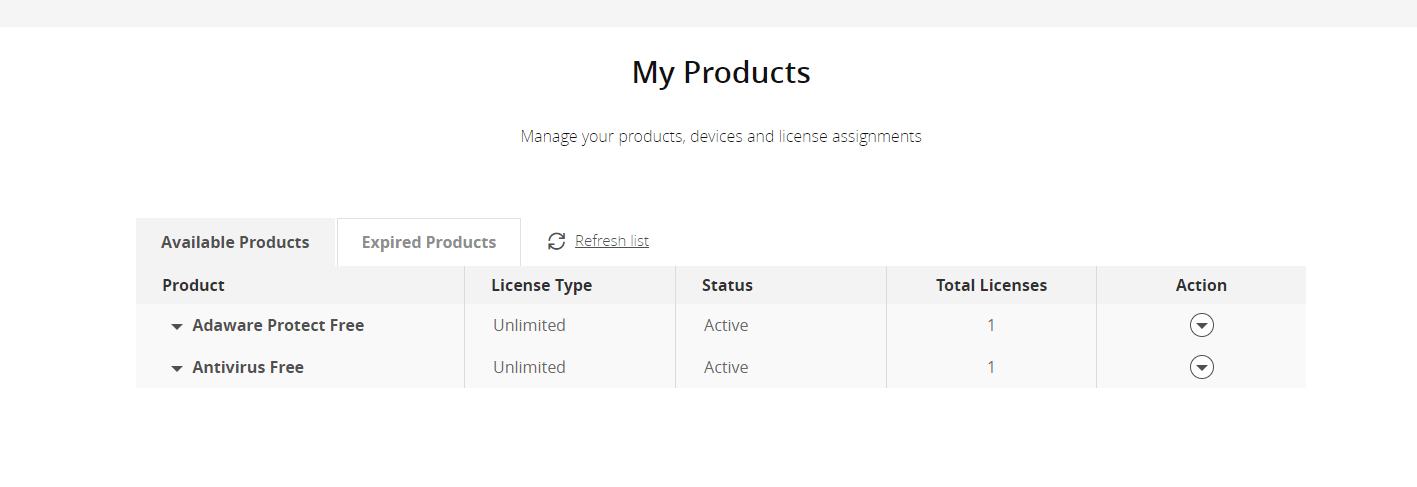
You can assign a license in the My Products section of your adaware account, assuming you have some unassigned licenses.
- Click the arrow next to Unassigned Licenses under a product.
- Choose Assign.
- Enter the email address.
- Click the green Assign.
** Pro Tip: You can also batch assign licenses to users
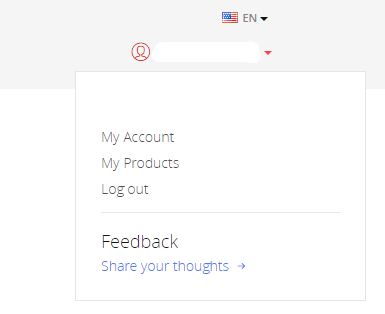
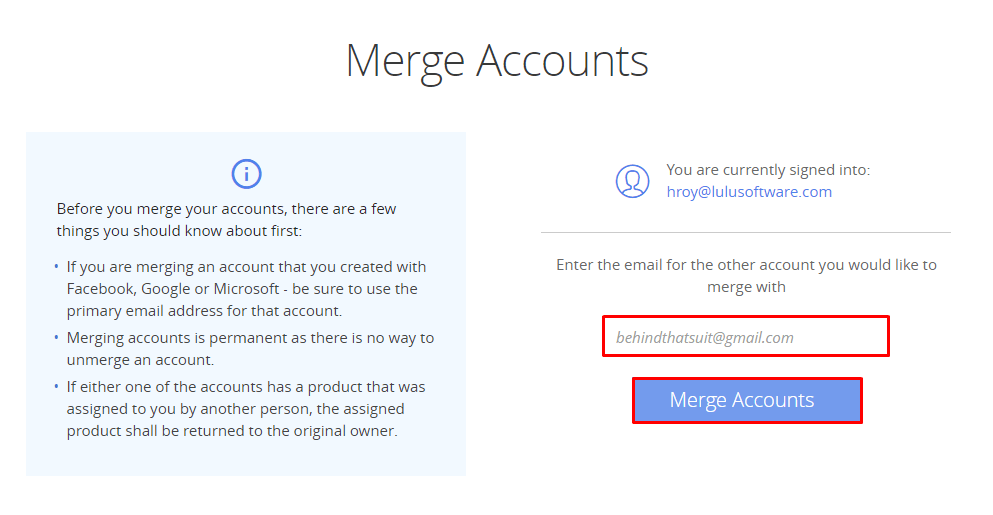
You will need to login to your account at myaccount.adaware.com.
- Click on your name in the top-right corner.
-
Choose My Account.
-
Click Merge Account.
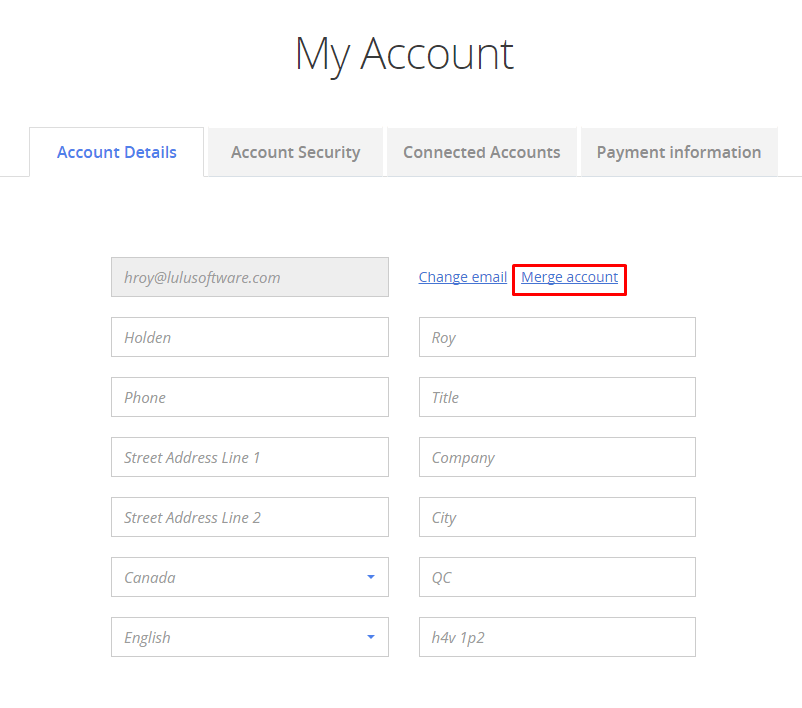
You will be brought to the page where you can proceed to merge your account. Please note that if you created an account with Facebook, Microsoft or Google you must use the primary email address associated with it.
Any products that have been assigned to the merged account by another person will be returned to the product owner once the merge is completed.
Finally, merging accounts is a permanent action that cannot be undone after the fact.
- Enter the email address of the account you want to merge with.
-
Click Merge Accounts.
-
Choose the account you'd like to keep using.
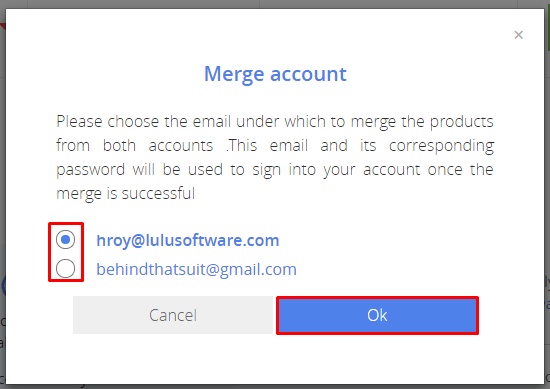
We'll send a confirmation email to the email address for the account that will be closed.
-
Click Ok to close this popup.
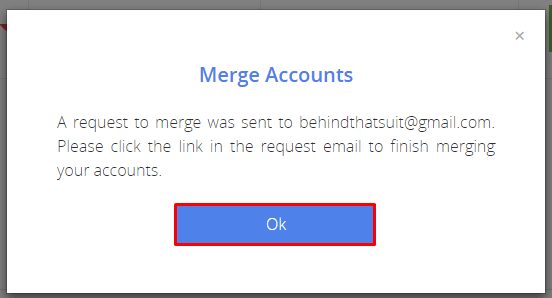
You'll need to click the link in the email we send to finish merging your accounts. Meanwhile you’ll be brought to the "pending merge requests" page. Here you can perform the following actions:
- Click Resend confirmation email if you did not receive the merge account validation email.
-
Choose Cancel request if you'd no longer like to merge accounts.
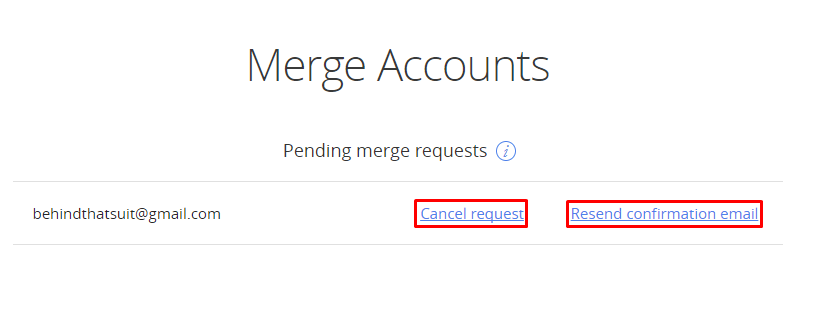
You can get to pending merge requests page at any time by choosing the Merge account option from the My Account page.
To finish merging accounts, go to the email we sent to the account that will be closed.
- Click CONFIRM MERGE REQUEST.
You'll be brought to a confirmation page to let you know the merge has been completed successfully.
How do i assign licenses to a user?
- Go to myaccount.Adaware.com.
- Sign in to your Adaware Account.
- Once you are signed in, click on your name at the top right corner of your screen.
- Select My Products.
- Click on the product name to expand it.
- Click on the arrow next to Unassigned Licenses.
-
Click Assign.
-
Enter the email address of the user you want to assign the license to
- Click Assign.
- The new user will appear under the list assignees.
- You've successfully assigned a license.
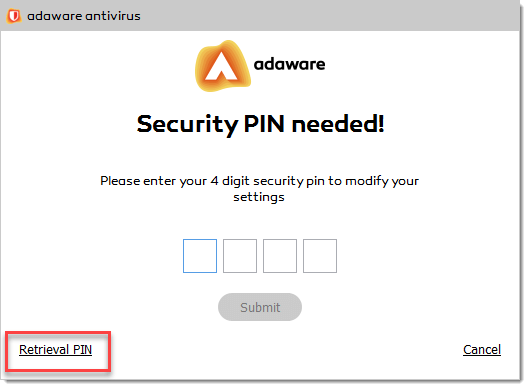
If you forgot your pin number, with the message box displayed, click the Retrieval PIN link.

Your 4 digit pin will be sent to the email address you have indicated as a retrieval one. If you cannot find it in your Inbox, please check your Spam and Junk folders.
 The retrieval email contains 4 digit pin presented as pictures. Make sure the Show Pictures feature is enabled in your email client. Please remember the digits and type them to the corresponding fields in the message box.
In the event that you have misplaced your serial number and download link, please contact customer support through My adaware.
For more information on how to register adaware antivirus, go to the How to register page of the Support section of the website.
For more information on activating adaware antivirus, go to the How to activate page of the Support section of the website.
Click here for our step-by-step guide on how to upgrade to the newest version of adaware antivirus.
To reset adaware antivirus to its default settings, proceed through the steps listed below:
- On the left navigation menu, select the App Management option. The App Management dialog opens.
-
In the Reset block, click the Reset button.
-
In the Reset All Settings dialog that appears, confirm your decision by clicking Reset.
If you have the Security PIN option enabled, you will be asked to type your four-digit pin number when attempting to reset all settings to default.
For more information on how to uninstall adaware antivirus, go to our Uninstall page of the Support section of the website.
When some components and features of the adaware antivirus program are not working properly, you can repair your installation.
Click here to access our step-by-step guide in the Support section.
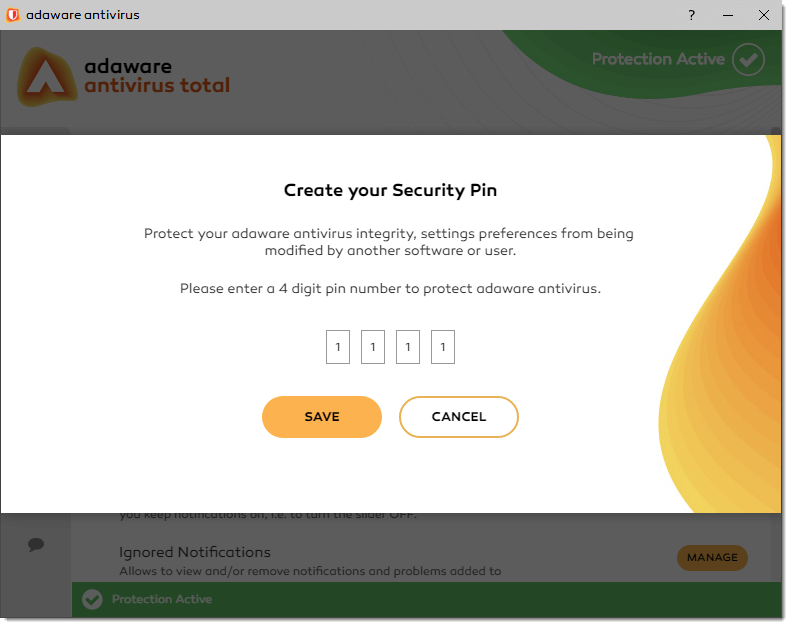
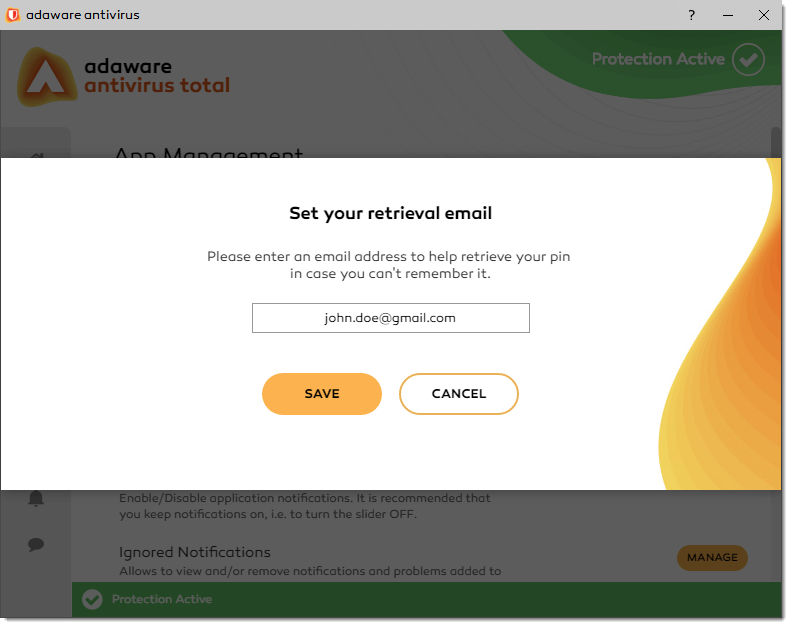
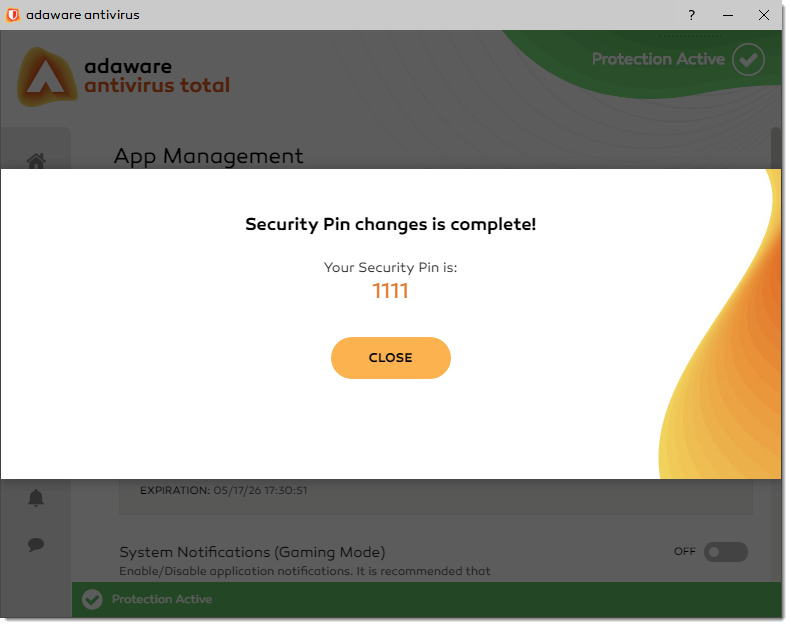
To create a security code for adaware antivirus, proceed through the steps listed below:
- On the left navigation menu, select the App Management option.
- In the App Management dialog, click the slider to enable the Security Pin feature.
-
With the message box displayed, enter your four digit pin number, and click the Save button.
-
In the Set Your Retrieval Email dialog that appears, enter your email address to help retrieving your pin if you forget it or use the wrong one. Click the Save button.
-
With the confirmation message box, click the Close button. The Security PIN feature is now enabled.
Now when you have the Security Pin enabled, you will be asked to enter it every time you try to manage adaware antivirus settings. Just enter your 4-digit code and click the Submit button.
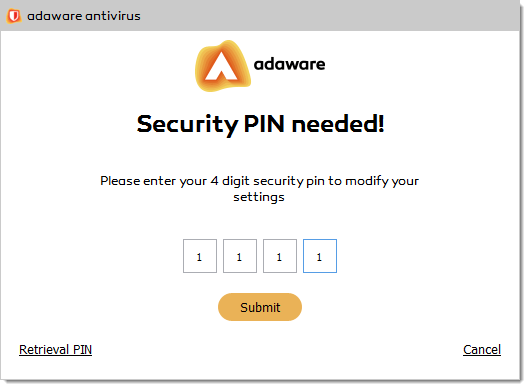
What to do if you forget your pin
If you forgot your pin number, with the message box displayed, click the Retrieval PIN link.
Your 4 digit pin will be sent to the email address you have indicated as a retrieval one. If you cannot find it in your Inbox, please check your Spam and Junk folders.
The retrieval email contains 4 digit pin presented as pictures. Make sure the Show Pictures feature is enabled in your email client. Please remember the digits and type them to the corresponding fields in the message box.
Customize security pin
To customize your Security Pin settings, proceed through the steps listed below:
- To change your security code, with the App Management dialog, in the Security Pin block, click Change your security code and enter your new 4-digit pin. Once you are done, click the Submit button. Your security code is now changed. Click the Close link to close the window.
-
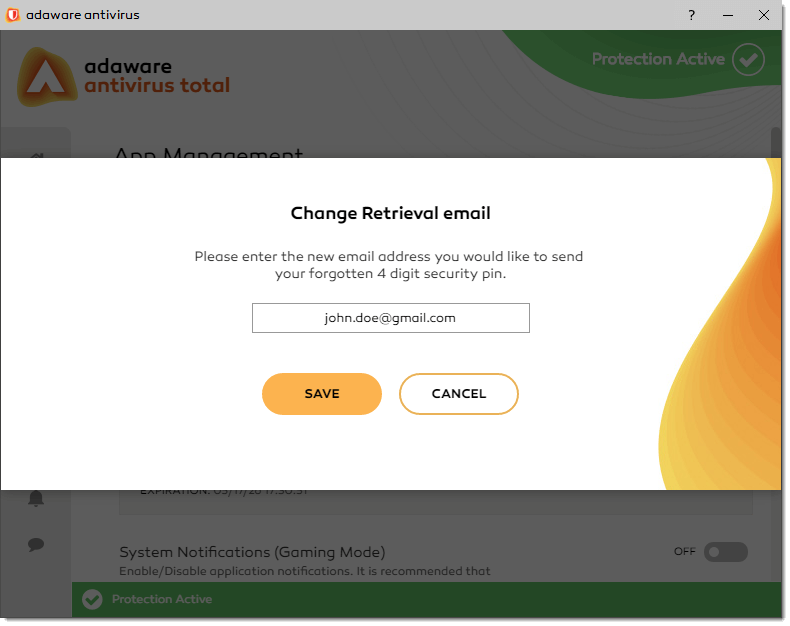
To change your retrieval email address, in the Security pin retrieval email block, click the Change your retrieval email address link.

-
In the Change Retrieval Email window that appears, type your new email address and click Save.
-
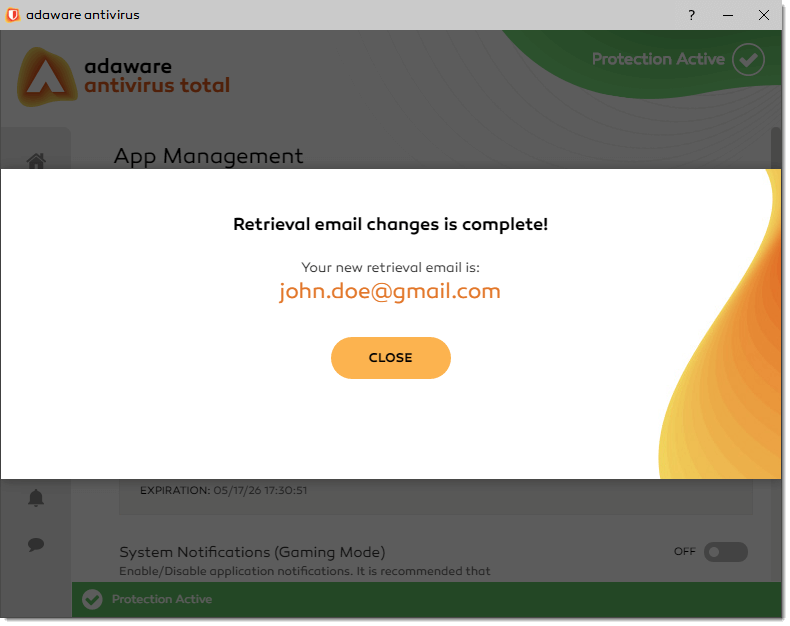
With the confirmation message box, click the Close button. Your retrieval email address is now changed.
To re-enable the Real-Time Protection feature after it has been disabled, proceed through the following steps:
- With the Command Prompt, go to the folder in which you installed your adaware antivirus, type the first letters of the adawareCommandLine.exe file name (for example, "ad"), and then press the Tab key. Or type the full name.
-
Type "--enable-realtime-protection" and press ENTER.

To check whether the Real-Time Protection feature was enabled in the program interface, follow these steps:
- Double-click the adaware antivirus icon on your desktop or the tray application in the system tray to launch adaware antivirus.
-
On the left navigation menu, click Real-Time Protection.
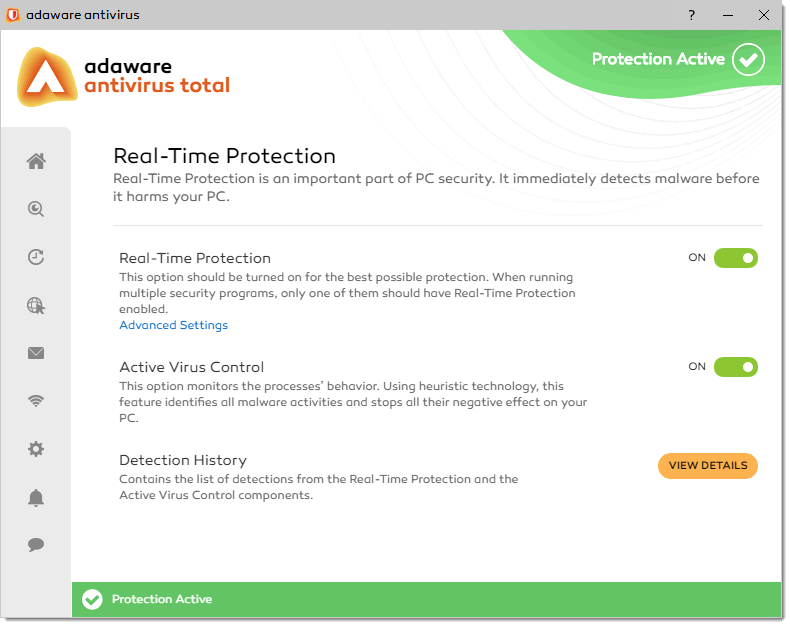
Single click the slider to switch between two positions. The green color stands for Enabled, which means that the Real-Time Protection security service is active and fully functional. The grey color represents the Disabled status, i.e. the service is deactivated. If you do not have a good reason to deactivate the service, we strictly recommend that you keep the Real-Time Protection feature turned on.
You can also enable/disable the Real-Time Protection feature from the Home tab.
If you've purchased adaware antivirus and you are seeing a Trial Expired message, it may be because you are not logged in. Check your account icon in the navigation sidebar. If you see a red circle next to it, it means you are not logged in. You will be logged in when you see a green sign next to the icon.
If you've logged in but you are still getting the trial expired messages, please call our support team.
How do i unassign a license?
- Go to myaccount.Adaware.com.
- Sign in to your Adaware Account.
- Once you are signed in, click on your name at the top right corner of your screen.
- Select My Products.
- Click on the product name to expand it.
- Click on the arrow next to the user you would like to unassign a license from.
-
Click Unassign.
-
Click Continue on the pop up to confirm you want to unassign the user.
- The user who has been unassigned will disappear from the list of assignees.
- You've successfully unassigned a license.
Click here to access our step-by-step guide on how to install adaware antivirus.
At adaware, we believe that every computer user must have the power to control their individual privacy and security when they use the Internet. That is why we offer adaware antivirus free, a proactive malware removal tool that allows users to combat today's toughest cyber threats. adaware antivirus free features real-time anti-malware protection, rootkit protection, and community-driven initiatives to ensure that you have the power to protect yourself online.
adaware antivirus personal is a paid upgrade of our adaware antivirus free version and builds upon the malware protection offered in our free product. adaware antivirus personal adds a powerful web-filter that protects users against phishing attacks and Active Virus Control that monitors the processes' behavior.
adaware antivirus pro is a paid upgrade of our adaware antivirus free version and provides a line-of-defense against the most extreme forms of malware and cyber threats. It adds a powerful two-way firewall, an Email Protection engine, advanced Web Protection as well as our most advanced detection and threat blocking algorithms.
adaware antivirus total is a paid upgrade of our adaware antivirus free version which above all adds the Parental Control feature to filter out all bad content.
To take advantages of using the full functionality of the product, we propose various upgrade options of the adaware antivirus program. All you have to do is buy an upgrade key from adaware:
- On the left navigation menu, select the Home option.
-
With the Home screen displayed, click the Upgrade button next to the feature you want to install.
-
With the message box displayed, click the Upgrade under the version you want to upgrade to.
- A web page will be opened in your web browser where you can choose the right version and purchase an appropriate upgrade license.
| Feature | kostelos | personal | pro | total |
| Scan Computer | + | + | + | + |
| Application Management | + | + | + | + |
| Echtzeitschutz | + | + | + | + |
| Gaming Mode | + | + | + | + |
| Ignored Notifications | + | + | + | + |
| Aktive Virusüberprüfung | + | + | + | |
| Web Protection | + | + | + | |
| Netzwerkschutz | + | + | ||
| Email Protection | + | + | ||
| Jugendschutz | + |
adaware antivirus is currently available in 22 languages:
- Englisch
- Deutsch
- Französisch
- Spanisch
- Polnisch
- Portugiesisch (Brasilien)
- Japanisch
- Italienisch
- Chinesisch
- Russisch
- Ukrainisch
- Georgisch
- Ungarisch
- Niederländisch
- Armenisch
- Serbisch (Lateinisch)
- Serbisch (Kyrillisch)
- Kroatisch
- Indonesisch
- Weißrussisch
- Türkisch
- Thailändisch
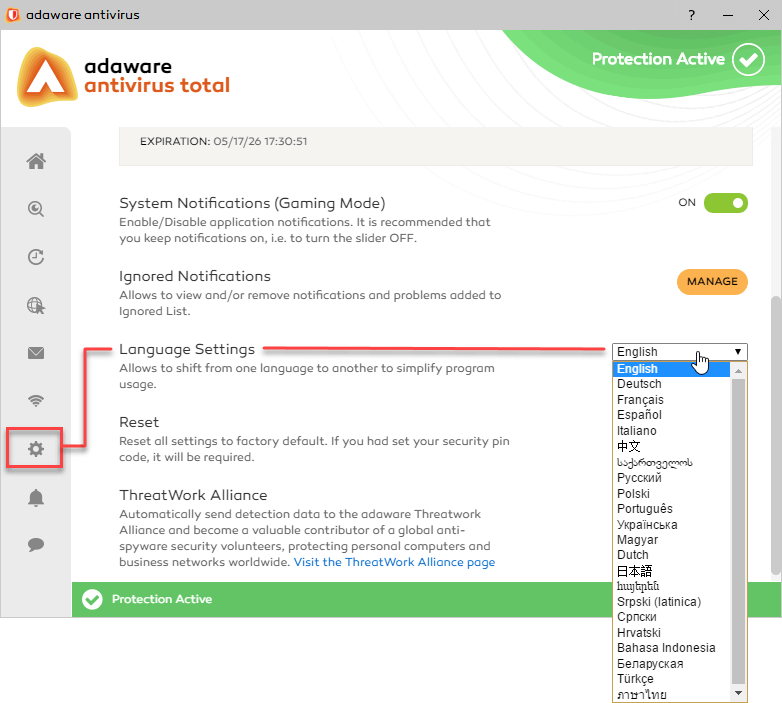
To change the language of the adaware antivirus interface, select the App Management menu option.
In the Language Settings block, select the language that you want to use.
If you're looking to download adaware antivirus free, you're in the right place!
Simply navigate to the antivirus product page on adaware.com and click on the DOWNLOAD FREE button. Follow the steps for installing adaware antivirus.
Virtually everyone with a computer has now heard of spyware, but where and when did it rear its ugly head for the first time? Here is a little history...
The word 'spyware' was used for the first time publicly in October 1995. It popped up on Usenet (a distributed Internet discussion system in which users post e-mail like messages) in an article aimed at Microsoft's business model. In the years that followed though, spyware often referred to 'snoop equipment' such as tiny, hidden cameras. It re-appeared in a news release for a personal firewall product in early 2000, marking the beginning of the modern usage of the word..
In 1999, Steve Gibson of Gibson Research detected advertising software on his computer and suspected it was actually stealing his confidential information. The so-called adware had been covertly installed and was difficult to remove, so he decided to counter-attack and develop the first ever anti-spyware program, OptOut.
That's where Lavasoft (now adaware) picked up and Gibson left off. He went on to other projects and Lavasoft became a pioneer in the anti-spyware industry with its signature free, downloadable product Ad-Aware (now adaware antivirus). Lavasoft's paid products soon followed and it is now the anti-spyware provider for 300 million computer users worldwide today.
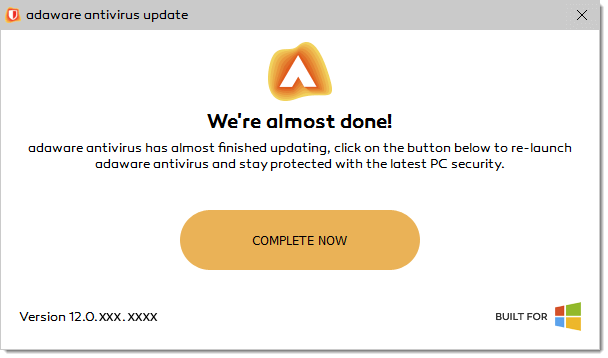
Whenever a new update of the <strong>adaware antivirus</strong> program is available, the following notification will appear:
adaware antivirus free users
- With the notification displayed, click the Complete Now button.
- The button will open the web browser to adaware.com to get the latest adaware antivirus version.
- Download the installation file.
- Run the downloaded file to start the installation process.
- Follow the instructions on your screen to complete the installation.
adaware antivirus personal/pro/total users
With the notification displayed, simply click the Complete Now button and follow the on-screen instructions to complete.
Yes, you will need your email address and password to activate your product.
To check the version of adaware antivirus you have installed on your computer, proceed through the steps listed below:
Step 1: On the panel, click the Question icon.

With the dialog displayed, learn more about the current version of adaware antivirus installed.
Alternatively, you can find information on the current version of adaware antivirus from the App Management screen.
If your serial number/registration key/activation code has been lost, there is a quick and easy way to get it back.
- Log in to My adaware account.
- Go to the 'My products' tab.
- Here you will find your license info. Below your license you can find a letter icon: 'E-mail Serial Number' and clicking it will automatically send an email with the serial number to your registered email address.
Note: the 'E-mail Serial Number' notification email may be filtered as spam. Please, check your spambox/ junkmail.
To use adaware in your preferred language, proceed through the steps listed below:
- On the left menu, click App Management. The App Management screen opens.
- In the Language block, select one of the supported languages from the drop-down combo box.
Gaming Mode is a feature of adaware antivirus that suspends pop-up notifications and baloons while playing a game. Thus, this mode allows you to have the pleasure of a full gaming experience, without being interrupted with different popups or other messages.
To enable the Gaming Mode, proceed through the steps listed below:
-
On the left navigation menu, select the App Management option. The App Management dialog opens.
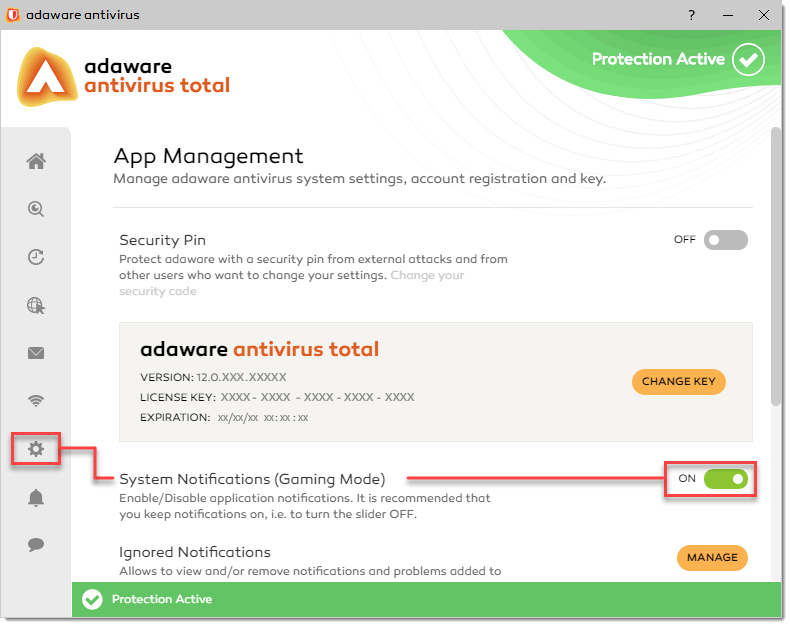
- In the System Notifications (Gaming Mode) block, click the slider to enable the feature.
By default, the Gaming Mode is disabled. Single click the slider to switch between two positions. The green color stands for Enabled, which means that the Gaming Mode is active and fully functional. The grey color represents the Disabled status, i.e. the mode is deactivated.
 There may be two cases, however, when the Gaming Mode allows the notification to appear: if you have set a Prompt action performed by the Network Protection feature on detecting a network connection attempt, or if you have set a Security PIN to protect adaware antivirus from external attacks and from other users who want to change your settings.
Step 1 - perform scan
You can run:
- Quick scan
- Full scan
- Custom scan
- Context menu scan
To perform Quick Scan or Full Scan, on the left navigation menu, click the Scan Computer option.
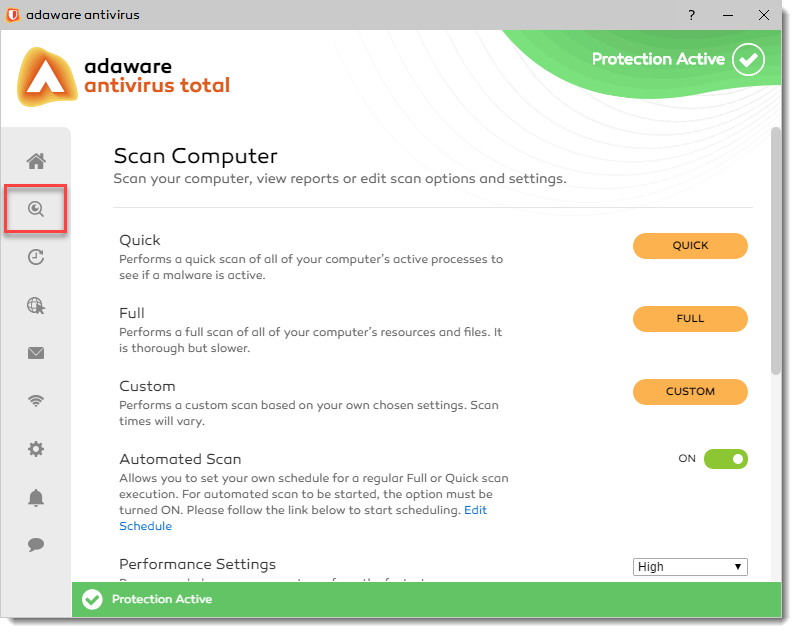
With the dialog displayed, click an option of your choice:
- Quick Scan to launch a quick scan.
- Full Scan to launch a full scan.
Alternatively, right-click the adaware antivirus tray application icon (on your Windows taskbar, right-hand bottom corner of your monitor) and select Quick Scan to run a Quick scan. Or, on the Home screen, click the Full Scan button to run a Full scan.
Custom scan
If you want to scan specific locations on your computer, configure and run a Custom scan
To run a Custom scan, proceed through the steps listed below:
- On the left navigation menu, click the Scan Computer option. Alternatively, on the Home screen, click the Scan options link.
- With the Scan computer dialog displayed, click the Custom button.
-
On the Custom Scan Settings dialog, configure the scanning option(s), as needed, by selecting corresponding check box(es):
Scan archives. Archives containing infected files are not an immediate threat to the security of your computer. The virus can affect your system if the infected file is extracted from the archive and executed without having Real-Time Protection feature enabled. However, we recommend you to use the Scan archives option to detect and remove any potential threat. The adaware antivirus program will scan not only traditional archives, such as RAR, ZIP or GZIP, but also other compound file types, such as MIME encoded email messages, CHM files, all Installers, and even OpenOffice documents.
Scan rootkits. Select this option to scan for rootkits and objects hidden using such malware. A rootkit is a set of software tools which offer administrator-level access to a system.
Scan email. Select this option to scan plaintext emails and e-mail databases.
Scan processes. Select this option to scan the processes running on your system, ensuring that no malicious processes are running.
Scan cookies. This option only works for Microsoft Windows, and it only triggers IE cookie scanning. At this moment, the cookies associated with other browsers are not scanned.
Scan registry. Select this option to scan all the programs which are set as autostart in the registry, together with the services and loadable drivers.
Deep scan. Select this option to enable deep scanning inside CHM and installer files, greatly increasing scanning time and increasing detection rate. This option is not required for normal operations, but might optionally be selected for the so-called "paranoid" mode.
Smart scan. Select this option to store the scan result together with a file checksum in a local database. Subsequent attempt to scan the same file will return the previously stored result, speeding up scanning. The adaware antivirus program rescans the file periodically to make sure the file wasn't incorrectly detected as clean.
Scan boot sectors. Select this option to scan the boot sectors of your hard disk. This sector of the hard disk contains the necessary computer code to start the boot process. When a virus infects the boot sector, the drive may become inaccessible and you may not be able to start your system and access your data.
- To select a drive/folder/file to scan, click the Add button and specify a drive/folder/file to be scanned.
- To remove an item from the Paths section, select the check box corresponding to an appropriate item and click the Delete button.
- Once you are done, click the Start Scan button to launch a custom scan.
Context menu scan
The Context Menu Scan is a type of on-demand scanning. You can use this type of scanning in the following situations:
- You suspect a specific file or folder to be infected or dangerous.
- Scan a network share before copying files to your computer.
To start the Context Menu Scan, right-click the file or folder you want to scan, and select Scan with adaware antivirus.

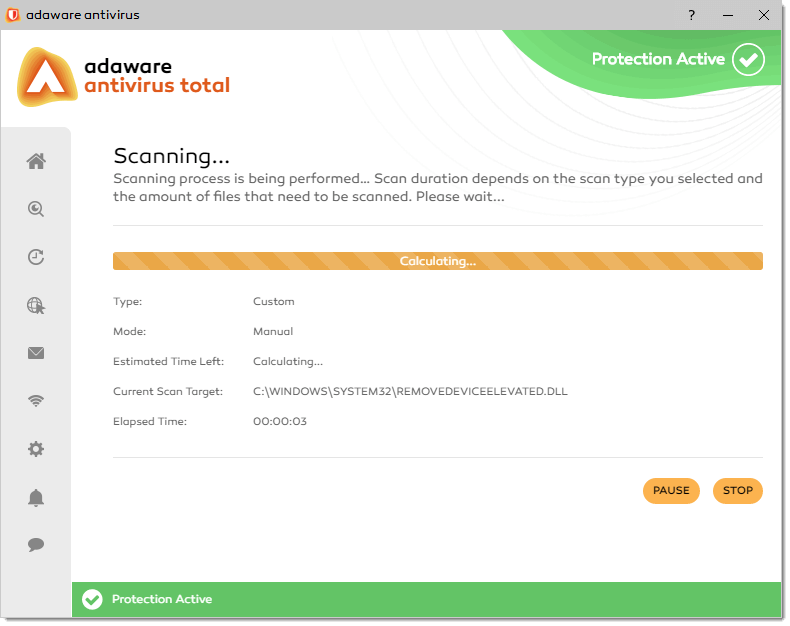
Once you start scanning, the balloon appears notifying you that the Context Menu Scan has been started. Click the View details link to open the scan window and to see the scan progress.
The adaware antivirus program will start scanning the selected objects. You can see the real-time information about the scan status and statistics (including the type of the scan, the scan mode, the estimated time left, the current scan target and the elapsed time).
Wait for the adaware antivirus to finish scanning. The scanning process may take a while, depending on the complexity of the scan.
You can stop scanning anytime you want by clicking the Stop button. To temporarily stop the scanning process, just click the Pause button. Click the Resume button to resume scanning.
After the scan is completed and no threats are detected, or if the scan is cancelled, adaware antivirus opens the Scan Complete dialog.

If you run a Quick Scan and there are threats detected, adaware antivirus will automatically remove these threats and open the Scan Complete dialog.
Step 2 - choose actions
If the scan process ends up with the threats detected, you will be prompted to choose the actions to be taken on the detected files. The detected files will be displayed in the Scan Summary dialog.
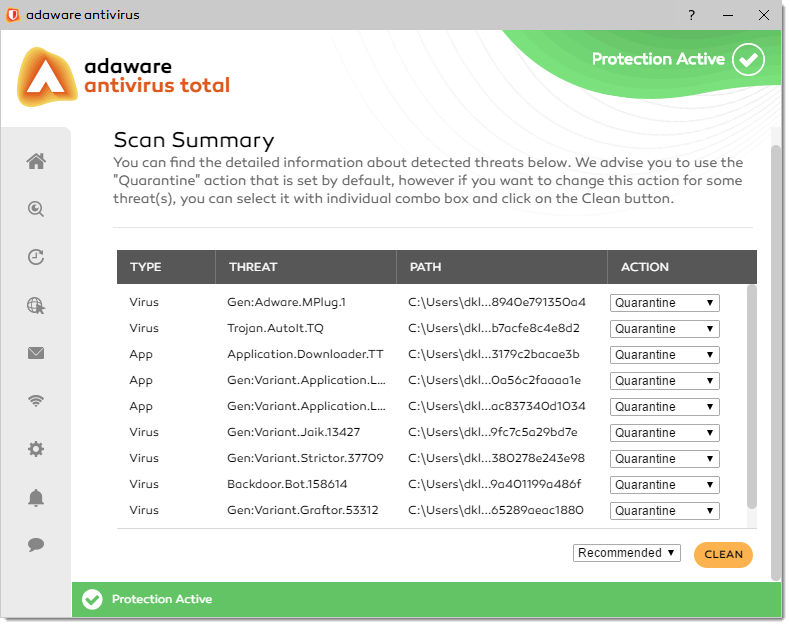
Here you can choose an action to be taken on the detected threat(s):
- Quarantine. Select this action to send malware-infected or suspicious files in a secure area named Quarantine. When a virus is in quarantine, it cannot do any harm because it cannot be executed or opened.
- Ignore. No action will be applied to the detected risks.
- Delete. Removes the infected files from the system.
- Disinfect. Attempts to remove infection from the infected files.
In some cases, the Disinfect action is not possible, because the detected file is entirely malicious. In such cases, the infected file is automatically deleted from the disk.
When adaware antivirus detects a threat, a balloon appears with a corresponding notification.
You can select an action to be taken on a particular threat:
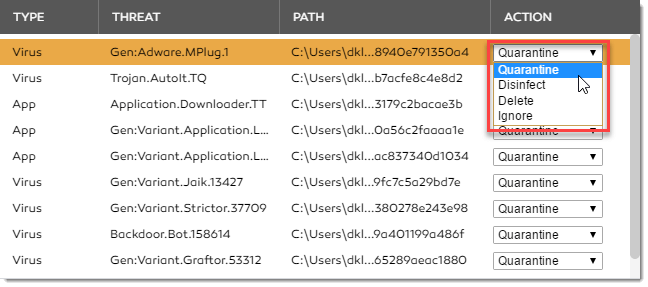
Or, you can choose an overall action to be taken for all issues found:
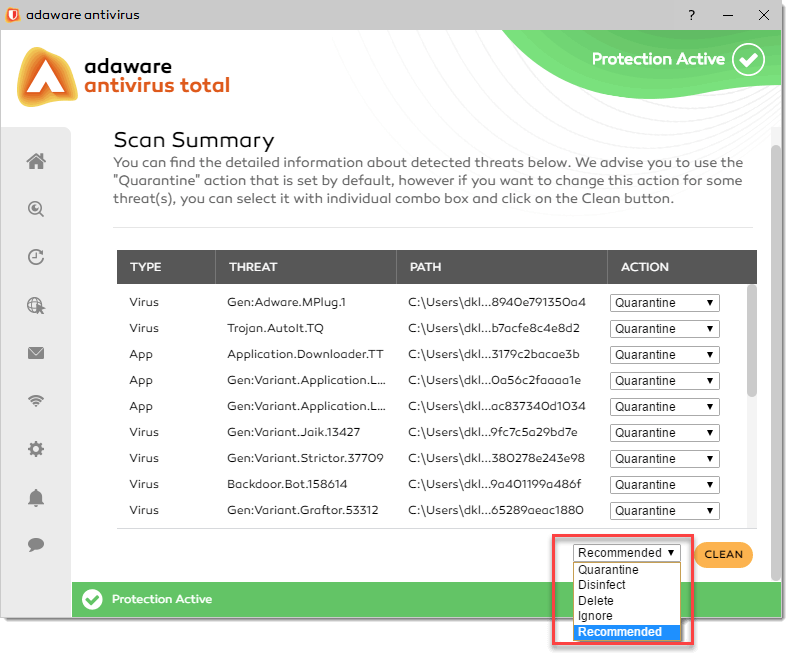
To apply an action to the threat(s) detected, choose the required action from the drop-down combo box and click the Clean button.
By default, the action applied to each threat is Recommended that implies Quarantine.
Wait for the adaware antivirus to finish the cleaning process.
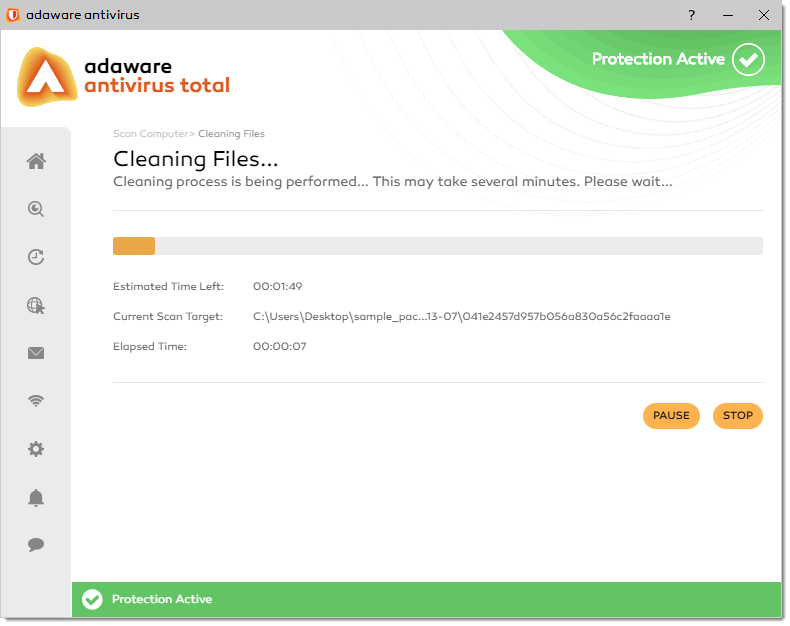
You can stop cleaning anytime you want by clicking the Stop button. To temporarily stop the cleaning process, just click the Pause button. Click the Resume button to resume cleaning.
Step 3 - summary
Once the threats are cleaned, the Scan Complete dialog displays the summary and details of the scan performed. Your computer is now clean of viruses and malware.
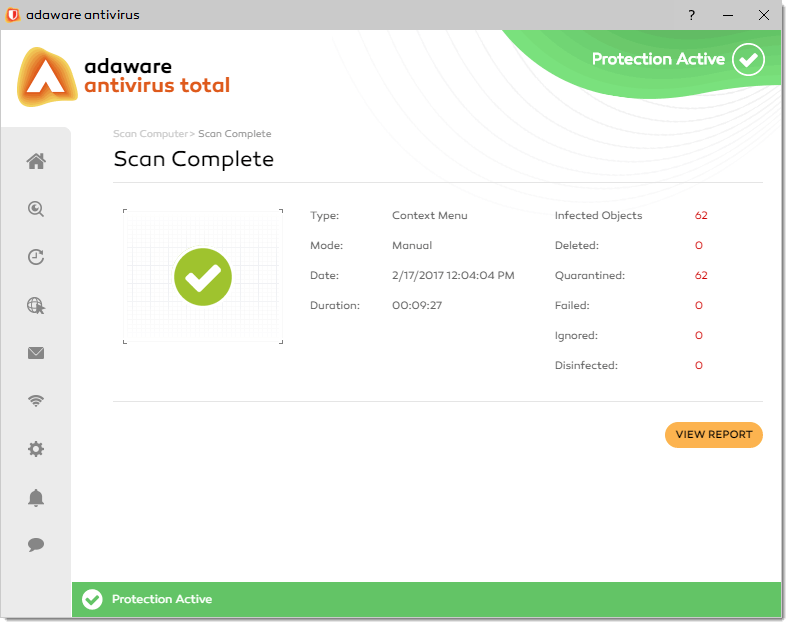
With the Scan Complete dialog, you can view the scan report by clicking the View Report button.
If no action is applied to the risks found, the Scan Summary dialog displays each time you navigate to the Scan Computer screen or try perform a new scan.
The Quarantine contains potentially harmful items detected by the adaware antivirus application which you can further remove from your computer. It is a safe place for storing threats, malware and/or infected files that could not be disinfected. You have an option to restore a quarantined item back to your computer in its original location, as well as permanently delete the quarantined item from your computer.
To access the quarantined files, proceed through the steps listed below:
- On the left navigation menu, select the Scan Computer option.
- With the dialog displayed, click the View Quarantined Files link under the Quarantined Files block.
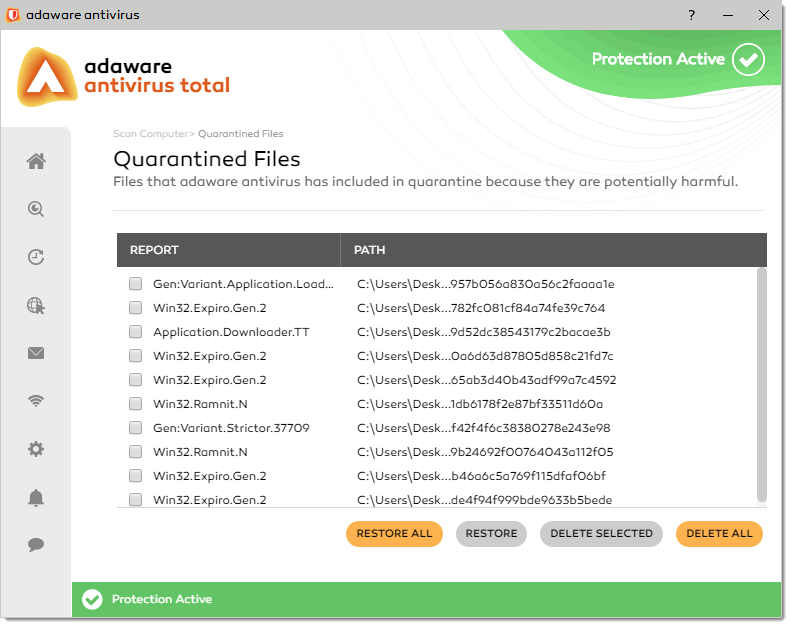
To restore a particular quarantined file, select a check box corresponding to this file and click the Restore button.
To restore all quarantined files, click the Restore All button.
To delete a quarantined file from your computer, select a check box corresponding to the file you wish to delete and click the Delete Selected button. The file will be removed from your computer permanently.
To delete all quarantined items from your computer, click the Delete All button.
To view the exact location of the threat, point to the threat path.
adaware is set to detect other antivirus programs during the installation. If an incompatible program is detected, the Compatible Install button is available only. adaware antivirus installation as a 2nd line of defense starts after clicking it. No drivers are installed. If any adaware drivers were installed earlier, they are removed.
If no incompatible program is detected, but you wish to install adaware as your second line of defense, you can do so by selecting the Install as a second line of defense only check box during the installation process.
If you would like adaware to be your primary line of defense, you will have to uninstall your current antivirus software before installing adaware.
Most conflicts are created when a user runs adaware and another antivirus with the same functionalities. At no point it is recommended to run two exact same features from different antivirus companies. This will create a conflict and make your system unstable.
adaware is incompatible with the following programs:
Avast!
Avast! Antivirus Free 4.8.1169 • Avast! Antivirus Free 4.8.1356 • Avast! Antivirus Free 4.8.1367 • Avast! Antivirus Free 5.0.377 • Avast! Antivirus Free 5.0.594 • Avast! Antivirus Free 5.0.677 • Avast! Antivirus Free 6.0.1000 • Avast! Antivirus Free 6.0.1091 • Avast! Antivirus Free 6.0.1125 • Avast! Antivirus Free 6.0.1203 • Avast! Antivirus Free 6.0.1270 • Avast! Antivirus Free 6.0.1289 • Avast! Antivirus Free 6.0.1367 • Avast! Antivirus Free 7.0.1407 • Avast! Antivirus Free 7.0.1426 • Avast! Antivirus Pro 4.7.879 • Avast! Antivirus Pro 4.8.1367 • Avast! Antivirus Pro 5.0.462 • Avast! Internet Security 5.0.594.0
AVG
AVG Antivirus 8.0.100 • AVG Antivirus 8.5.336 • AVG Antivirus 9.0.787 • AVG Antivirus 9.0.864 • AVG Antivirus 9.0.914 • AVG Antivirus 9.0.927 • AVG Antivirus 9.0.930 • AVG Antivirus 10.0.1415 • AVG Antivirus 12.0.0.1869 • AVG Antivirus 12.0.0.1872 • AVG Antivirus 12.0.0.1873 • AVG Antivirus 12.0.0.1890 • AVG Antivirus 2012 2012.0.1901 • AVG Antivirus 2012 2012.0.1913 • AVG Antivirus 2012 2012.0.2127 • AVG Antivirus 2012 2012.2169.4956 • AVG Antivirus 2012 2012.2171 • AVG Antivirus 2012.0.2126 • AVG Antivirus 2012.0.2197 • AVG Antivirus Business Edition 2012.0.2114 • AVG Antivirus Business Edition 2012.0.2126 • AVG Internet Security 2011 10.0.1152 • AVG Internet Security 2011 10.0.1392 • AVG Internet Security 2011 10.0.1411 • AVG Internet Security 2011 10.0.1424 • AVG Internet Security 2012 12.0.1769 • AVG Internet Security 2012 12.0.1831 • AVG Internet Security 2012 12.0.0.1827 • AVG Internet Security 2012 12.0.0.2164 • AVG Internet Security 2012 12.0.0.2180 • AVG Internet Security 2012 12.0.0.2197 • AVG Internet Security 2012 12.0.0.2221 • AVG Internet Security 8.5.336
Avira
Avira Antivirus Personal Edition 6.31.00.003 • Avira Antivirus Personal Edition 6.32.00.06 • Avira Antivirus Personal Edition 6.32.00.07 • Avira Antivirus Personal Edition 6.32.00.50 • Avira Antivirus Personal Edition 6.32.00.51 • Avira Antivirus Personal Edition 6.34.00.26 • Avira Antivirus Personal Edition 6.34.00.117 • Avira Antivirus Personal Edition 6.34.00.148 • Avira Antivirus Personal Edition 6.35.00.243 • Avira Antivirus Personal Edition 8.1.00.295 • Avira Antivirus Personal Edition 8.2.0.334 • Avira Antivirus Personal Edition 9.0.0.386 • Avira Antivirus Personal Edition 9.0.0.394 • Avira Antivirus Personal Edition 9.0.0.403 • Avira Antivirus Personal Edition 9.0.0.407 • Avira Antivirus Personal Edition 9.0.0.418 • Avira Antivirus Professional 10.0.0.911 • Avira Antivirus Personal 10.0.0.567 • Avira Antivirus Personal 10.2.0.703 • Avira Free Antivirus 12.0.0.1125 • Avira Free Antivirus 12.0.0.1167 • Avira Free Antivirus 12.0.0.872 • Avira Free Antivirus 12.0.0.898 • Avira Free Antivirus 12.3.0.15 • Avira Antivirus Server 10.0.0.1763
BitDefender
BitDefender Antivirus Plus 2012 15.0.27.304 • BitDefender Client Security 11.0.20 • BitDefender Client Security 11.0.22 • BitDefender Internet Security 2012 15.0.27.304 • BitDefender Management Agent 3.1.8 • BitDefender Management Agent 3.1.9 • BitDefender Management Agent 3.1.8 • BitDefender Management Agent 3.1.9 • BitDefender Total Security 2012 15.0.27.304
CA
CA eTrust ITM 8.1.637.0 • CA eTrust ITM 8.1.655.0 • CA Internet Security Suite 6.0.0.285 • CA Internet Security Suite 7.0.0.279 • CA Internet Security Suite 7.0.0.115 • CA Internet Security Suite 7.0.0.107 • CA Total Defense 12.0.528 • CA Total Defense 12.0.723 • CA Total Defense 12.0.831 • CA Total Defense 12.0.833
Constant Guard
Constant Guard Protection Suite 1.12.829.1
ESET NOD32
ESET NOD32 Antivirus Business Edition 3.0.669.0 • ESET NOD32 Antivirus Business Edition 4.0.417.0 • ESET NOD32 Antivirus Business Edition 4.0.474.0 • ESET NOD32 Antivirus Business Edition 4.2.67.10 • ESET NOD32 Antivirus Business Edition 4.2.71.2 • ESET NOD32 Antivirus Business Edition 4.2.76.0
eEye Digital Security
eEye Digital Security Blink Professional 4.8.1.2824 F-Secure • F-Secure Anti-Virus 9.01.101 • F-Secure Internet Security 2010 10.00.24 • F-Secure Internet Security 2010 10.12.108 • F-Secure Internet Security 2011 10.51.106</p> <p class="accordion-content__txt">Fortinet
FortiClient 4.2.0.0250 • FortiClient 4.0.2.57
Kaspersky
Kaspersky Antivirus 6.0.4.1611 • Kaspersky Antivirus 6.0.4.1212 • Kaspersky Antivirus 6.0.4.1424 • Kaspersky Antivirus 6.0.3.837 • Kaspersky Antivirus 9.0.0.459 • Kaspersky Endpoint Security 8 for Windows 8.1.0.646 • Kaspersky Endpoint Security 8 for Windows 8.1.0.831 • Kaspersky Internet Security 2012 12.0.0.374 • Kaspersky Lab Network Agent 8.0.2090 • Kaspersky Lab Network Agent 8.0.2134 • Kaspersky Lab Network Agent 9.0.2786 • Kaspersky Lab Network Agent 9.0.2825 • Kaspersky Security Center Network Agent 9.2.69
McAfee
McAfee Agent 4.0.0.1494 • McAfee Agent 4.5.0.1270 • McAfee Agent 4.5.0.1499 • McAfee Agent 4.6.0.1694 • McAfee Antivirus Plus 10.0.575 • McAfee Antivirus Plus 10.0.570 • McAfee Antivirus Plus 10.5.218 • McAfee Antivirus Plus 11.0.678 • McAfee Internet Security 10.5.0.0 • McAfee Internet Security 11.0.623 • McAfee Security as a Service 5.2.1.132 • McAfee Security as a Service 5.2.1.114 • McAfee Security as a Service 5.4.0.148 • McAfee Site Advisor Enterprise Plus 3.0.0.476.5 • McAfee Site Advisor Enterprise Plus 3.0.0.476 • McAfee Site Advisor Enterprise Plus 3.0.0.638 • McAfee Total Protection 10.5.0.0 • McAfee Virtual Technician 5.5.1.0 • McAfee VirusScan Enterprise 8.0.0 • McAfee VirusScan Enterprise 8.5.0 • McAfee VirusScan Enterprise 8.6.0 • McAfee VirusScan Enterprise 8.7.0 • McAfee VirusScan Enterprise 8.7.00004 • McAfee VirusScan Enterprise 8.7.0.220 • McAfee VirusScan Enterprise 8.8.0
Microsoft
Microsoft Baseline Security Analyzer 1.2.4013.0 • Microsoft Baseline Security Analyzer 2.1.2111 • Microsoft Forefront Client Security 1.5.1937.0 • Microsoft Forefront Endpoint Protection 2.0.657.0 • Microsoft Security Essentials 1.0.1963.0 • Microsoft Security Essentials 2.1.1116.0 • Microsoft Security Essentials 4.0.1526.0
Norman
Norman Endpoint Protection 8.10.0300 • Norman Security Suite 7.10.1900 • Norman Security Suite 8.00.1400
Panda
Panda Antivirus Pro 2012 11.00.00 • Panda Antivirus Pro 2011 4.00.00 • Panda Cloud Antivirus 2.0.1 • Panda Endpoint Agent 5.50 • Panda Security for Desktops 4.05.15.0000 • Panda Security for File Servers 8.05.15.0000
PrevX
PrevX 3.0.5.219
Sophos
Sophos Anti-Virus 6.5.1 • Sophos Anti-Virus 7.6.9 • Sophos Anti-Virus 9.7.3 • Sophos Control Center 4.0.0.2362 • Sophos Endpoint Security And Control 9.0.5 • Sophos Endpoint Security And Control 9.7.6 • Sophos Endpoint Security And Control 9.5.5 • Sophos Endpoint Security And Control 10.0.6 • Sophos Endpoint Security And Control 10.0.7
Symantec
Symantec Antivirus 10.1.394.0 • Symantec Antivirus 10.1.0.238 • Symantec Antivirus 10.0.2.2000 • Symantec Antivirus 10.0.359.0 • Symantec Antivirus 10.1.5.5000 • Symantec Antivirus Corporate Edition 9.0.0.338 • Symantec Antivirus Corporate Edition 10.1.8.8000 • Symantec Antivirus Corporate Edition 10.2.2 • Symantec Endpoint Protection 11.0.5002.333 • Symantec Endpoint Protection 11.0.3001.2198 • Symantec Endpoint Protection 11.0.2010.7 • Symantec Endpoint Protection 11.0.4202.75 • Symantec Endpoint Protection 11.0.6005.562 • Symantec Endpoint Protection 11.0.6100.463 • Symantec Endpoint Protection 11.0.6100.645 • Symantec Endpoint Protection 11.0.6200.754 • Symantec Endpoint Protection 11.0.6300.803 • Symantec Endpoint Protection 11.0.780.1008 • Symantec Endpoint Protection 11.0.7000.975 • Symantec Endpoint Protection 11.0.7101.1056 • Symantec Endpoint Protection 12.0.1001.95 • Symantec Endpoint Protection 12.1 • Symantec Endpoint Protection 12.1.671.4971 • Symantec Endpoint Protection 12.1.1000.157
Symantec Norton 360
Symantec Norton 360 5.1.0.29 • Symantec Norton 360 6.0.0.145 • Symantec Norton Antivirus 17.0.0.136 • Symantec Norton Antivirus 18.1.0.37 • Symantec Norton Antivirus 19.1.0.28 • Symantec Norton Internet Security 19.5.0.145 • Symantec Norton Internet Security 19.1.0.28 • Symantec Norton Internet Security 18.1.0.37 • Symantec Norton Internet Security 17.0.0.136 • Symantec Norton Security Scan 3.6.1.11
Trend Micro
TrendMicro Antivirus 17.50 • Trend Micro Client Server Messaging Security for SMB 3.6 • Trend Micro Client/Server Security Agent 16.0.4123 • Trend Micro Endpoint Security 8.2.1093.0 • TrendMicro Internet Security 17.50 • TrendMicro OfficeScan Client 10.5.1083 • TrendMicro OfficeScan Client 10.5.1103 • TrendMicro OfficeScan Client 10.0.1068 • TrendMicro OfficeScan Client 8.30.0000 • TrendMicro OfficeScan Client 8.0 • TrendMicro Titanium Antivirus Plus 3.0 • TrendMicro Titanium Internet Security 3.0 • TrendMicro Titanium Internet Security 5.0 • TrendMicro Titanium Internet Security 5.2 • TrendMicro Titanium Maximum Security 3.0 • TrendMicro Titanium Maximum Security 3.0.1303 • TrendMicro Worry-Free Business Security 7.0.1598 • TrendMicro Worry-Free Business Security 7.0.1638 • TrendMicro Worry-Free Business Security 16.0.3240 • TrendMicro Worry-Free Business Security 16.0.3300 • TrendMicro Worry-Free Business Security 17.0.2316
adaware antivirus creates a scan report after each manual or automated scan you perform.
To access the Scan Report List screen, proceed through the steps listed below:
- On the left navigation menu, click the Scan Computer option. Scan Computer dialog displayed, click the View button under the Report List block.
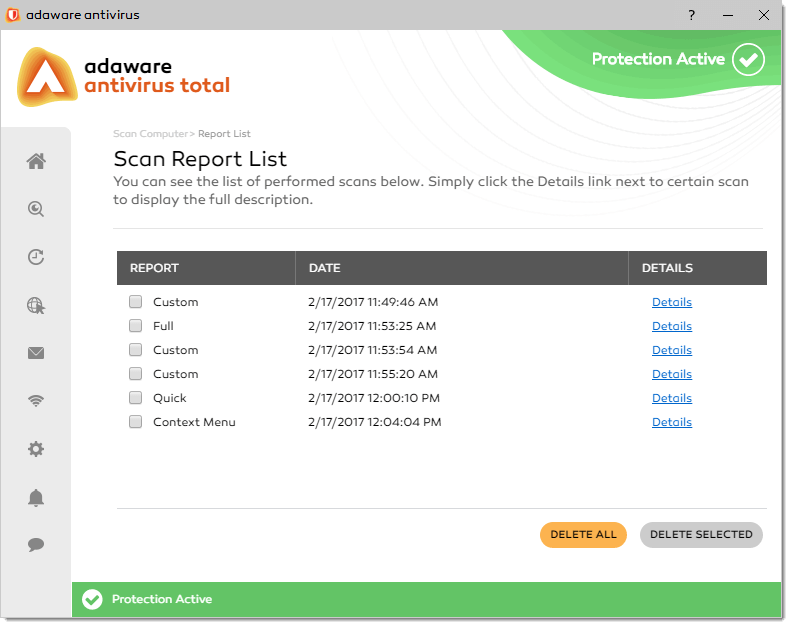
To delete a particular scan report from the list, select a check box corresponding to this report and click the Delete Selected button.
To delete all scan reports, click the Delete All button.
To view detailed information about the scan report, click the Details link in the report line. The Scanned Report Details dialog appears.
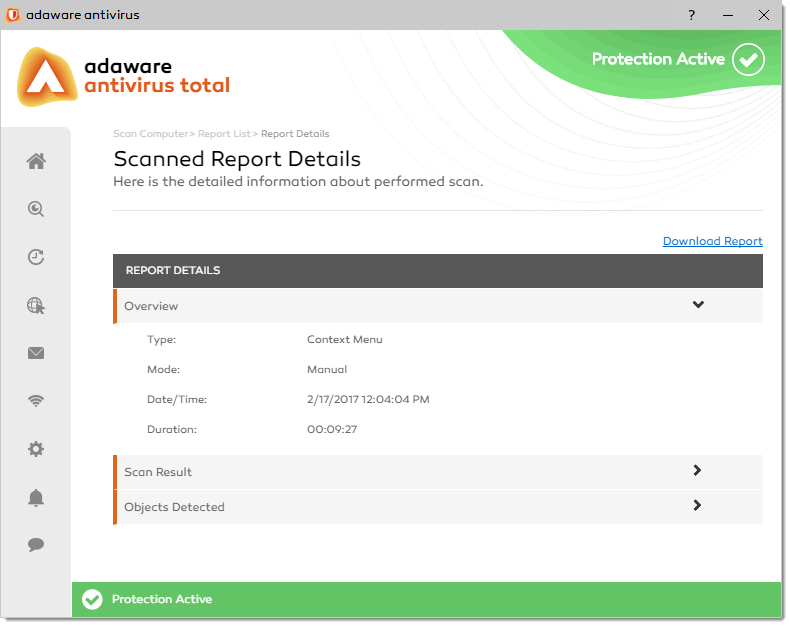
The details are presented in the Report Details table. Here you can see three slide boxes:
- Overview
- Scan Result
- Objects Detected
Each slide box contains details of a specific report. To expand a slide box, click in the slide box caption.
In addition, you can download a report as an XML file. To do this, click the Download Report link located above the Report Details table.
To schedule a scan and configure the scheduling options, proceed through the steps listed below:
- On the left navigation menu, select the Scan Computer option. Automated Scan block, and click the Edit Schedule link.
-
With the Automated Scans dialog displayed, specify the scanning parameters listed below:
- Scan my computer. Specify the scan frequency, such as Daily, Weekly, or Monthly. For Weekly and Monthly automated scans, choose either a particular day of a week or a day of a month.
- Scan type. Choose the scan type that you want to schedule, Quick Scan or Full Scan.
- Scan time. Specify the scan time by typing numbers in the hour and minute fields, and entering AM or PM. You can also set the scan time using your keyboard Up and Down arrows, or the scroll wheel.
The time is displayed in 12 hour format.
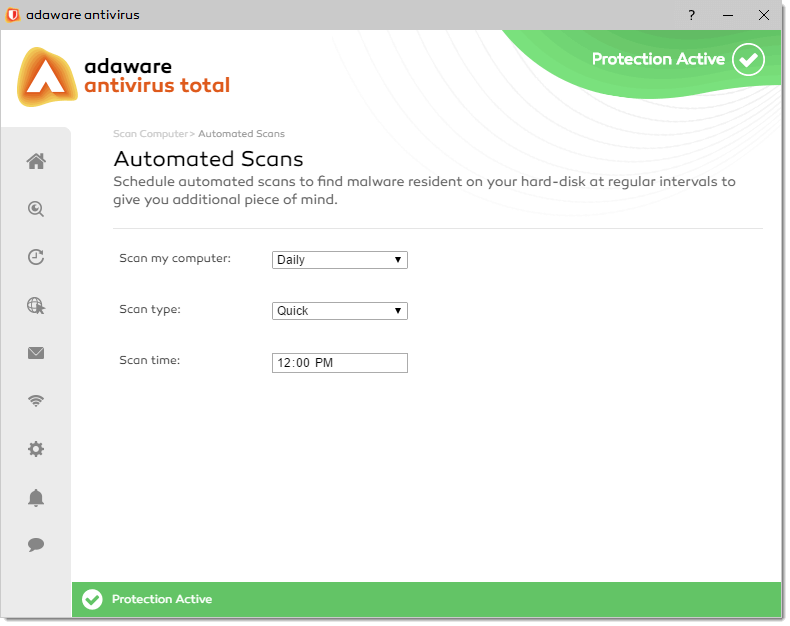
By default, the Automated Scan feature is enabled. Single click the slider to switch between two positions. The green color stands for Enabled, which means that the Automated Scan feature is active and fully functional. The grey color represents the Disabled status, i.e. the service is deactivated.
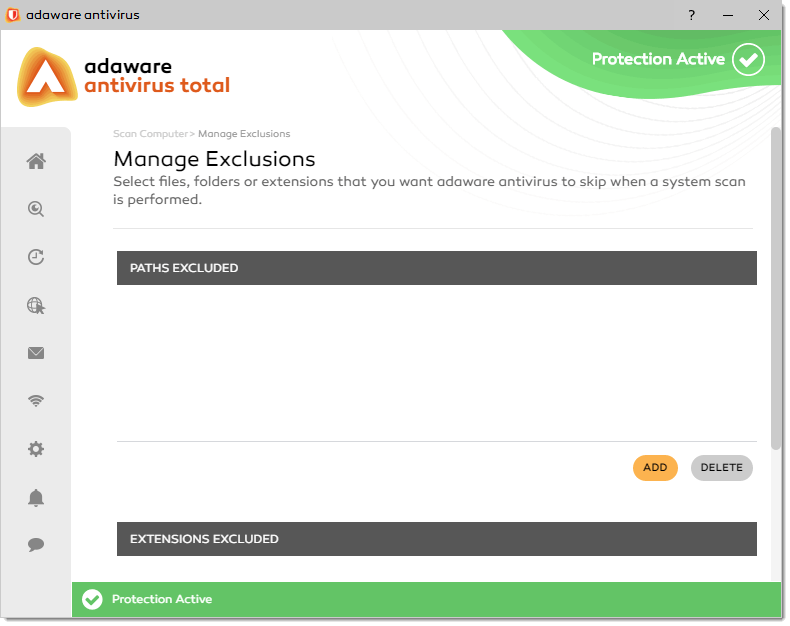
The adaware antivirus application allows you to exclude specific files, folders or extensions from scanning. The objects excluded from scanning, will not be scanned and will not be blocked by the Real-Time Protection feature.
Excluding files or folders from scanning
To exclude specific files or folders from scanning, follow these steps:
- On the left navigation menu, select the Scan Computer option.
- With the Scan Computer dialog displayed, click the View button under the Manage Exclusions block.
-
The Manage Exclusions dialog appears.
 <
<
- Click the Add button located at the bottom of the Path Excluded table.
- In the window that appears, select the file or folder that you want to exclude from scanning and click OK.
-
The specified file or folder appears in the list.
 <
<
To remove an item from the Paths Excluded list, select a check box corresponding to this item and click Delete.
Excluding extensions from scanning
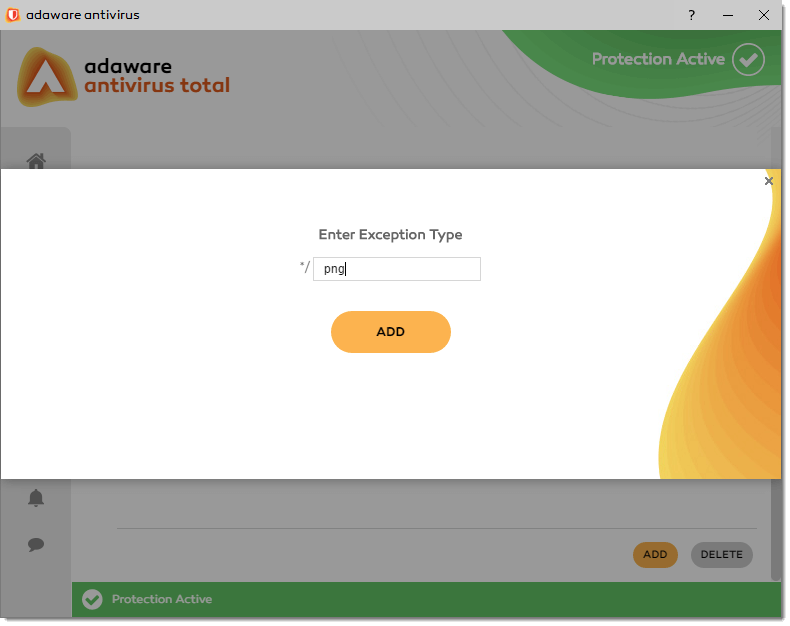
To exclude file extensions from scanning, follow these steps:
- On the left navigation menu, select the Scan Computer option.
- With the Scan Computer dialog displayed, click the View button under the Manage Exclusions block.
- The Manage Exclusions dialog appears.
- Click the Add button located at the bottom of the Extensions Excluded table.
- In the window that appears, type the extension that you want to be excluded from scanning. For example: txt.
-
Click Add.
 <
<
To remove an item from the Extensions Excluded list, select a check box corresponding to this item and then click Delete.
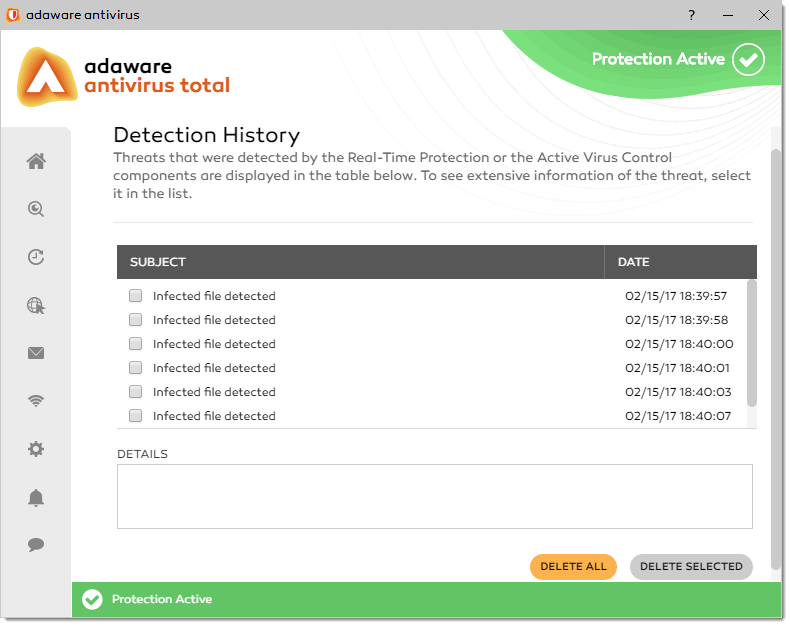
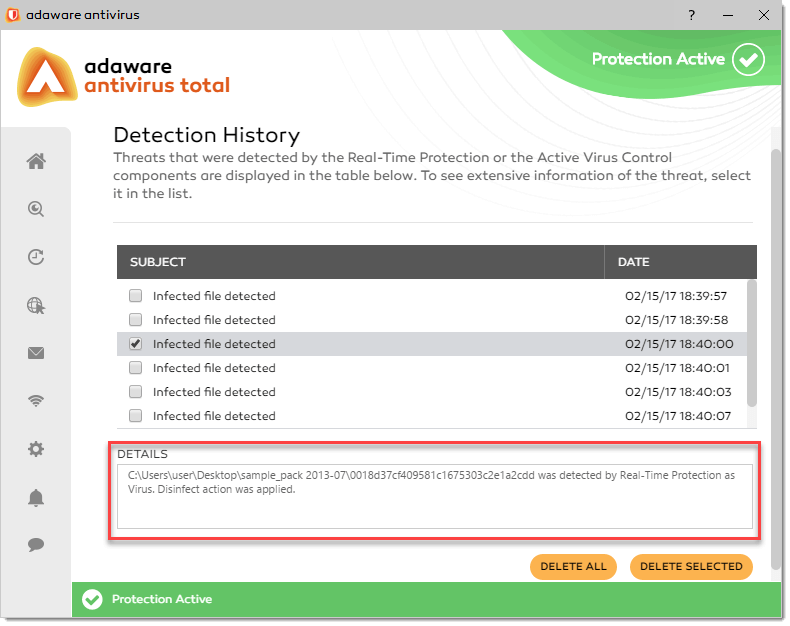
Any threat detected by the Real-Time Protection or the Active Virus Control components is recorded in the Detection History.
To access the Detection History, proceed through the steps listed below:
- On the left navigation menu, select the Real-Time Protection option.
-
With the Real-Time Protection dialog displayed, click the View Details button of the Detection History block. The Detection History dialog appears:
 <
<
To view detailed information on a detected threat, select it from the report list (click the event area, not the checkbox itself). The data will appear in the Details field.
 <
<
To delete a report from the Detection History list, select the needed item by checking an appropriate checkbox and click the Delete Selected button.
To delete all reports, click Delete All.
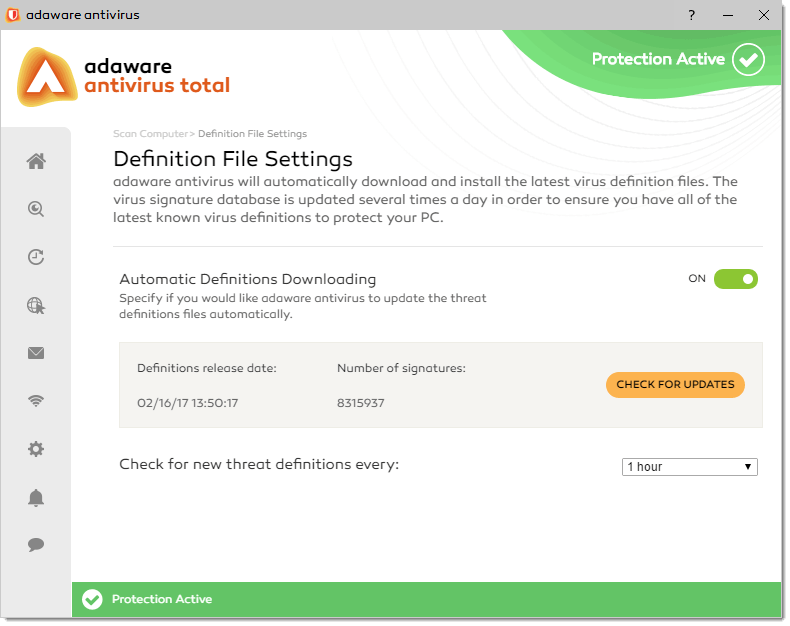
adaware antivirus uses continuously updated definitions to protect you from all sorts of malware and it is important to keep adaware antivirus updated regularly.
To enable and configure the Automatic Definitions Downloading feature, proceed through the steps listed below:
- On the left navigation menu, select the Scan Computer option.
- With the dialog displayed, click the Modify Settings button next to the Definition Files block.
- In the window that appears, you will see the Automatic Definitions Downloading feature already enabled. It means that adaware antivirus will automatically download and install new threat definitions. Single click the slider to switch between two positions. The green color stands for Enabled, which means that the Automatic Definitions Downloading feature is active and fully functional. The grey color represents the Disabled status, i.e. the feature is deactivated. If you do not have a good reason to disable the feature, we strictly recommend that you keep the Automatic Definitions Downloading feature turned on.
-
Specify the frequency (from 1 hour to 24 hours) when adaware antivirus should check for new threat definition files using the Check for new Threat Definitions Every drop-down combo box.
 <
<
To update threat definitions manually, click the Check for updates button of the Definition File Settings window:
 <
<
Or, navigate to the Home tab and click the Check for Updates link:
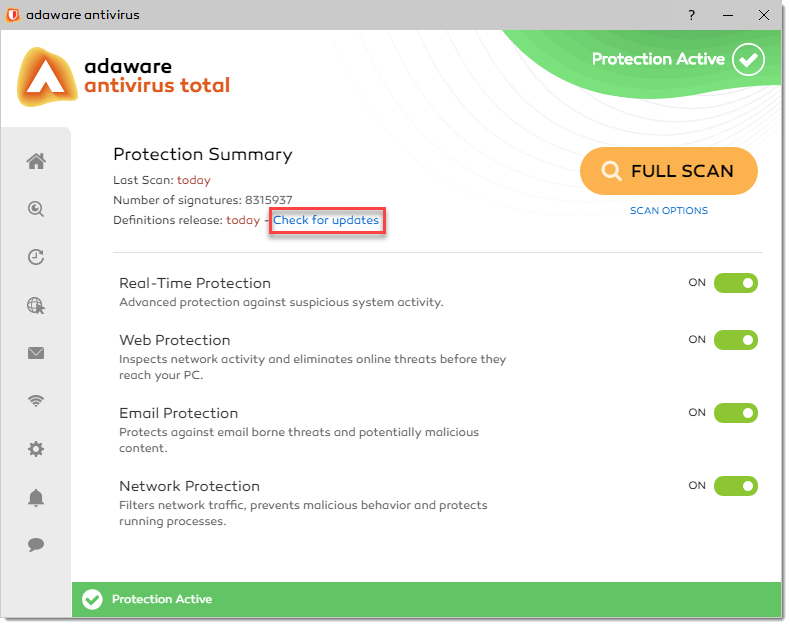 <
<
The Alliance is our global community of security volunteers that take an active role alongside adaware as we work together to provide a better and safer internet experience.
By submitting your suspicious files and sharing your scan results with us, we'll be able to turn that information into advanced and innovative technology that addresses the malware threats that menace not only your own personal systems, but also those of your family, friends, colleagues and your company.
What's Important to know is that we do not keep or file any information that can identify you as an individual.
That stuff is all purged and never hits our database, so there is never a risk for breach of information. To help put your mind at ease, click here to find out what information is collected when you sign up as part of the Threatwork Alliance and agree to submit your scan results to our development team.
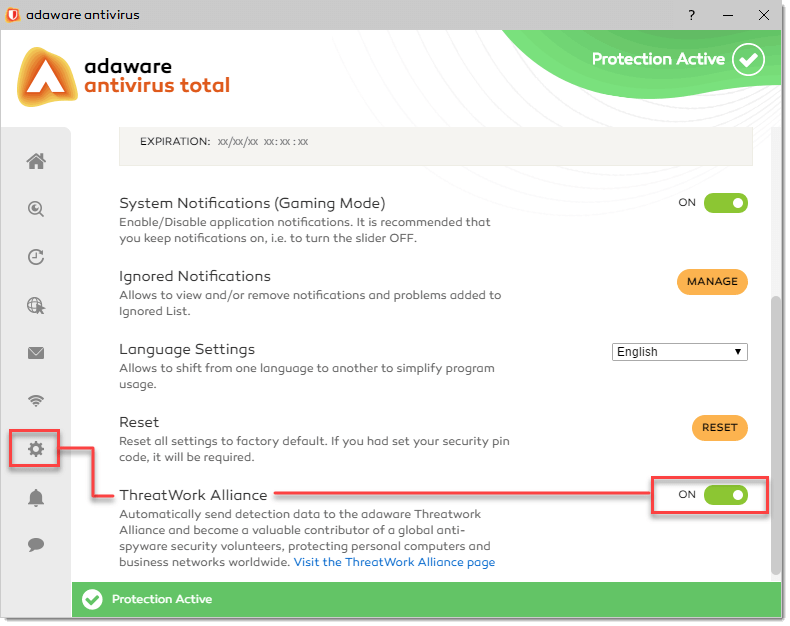
If you want to send detection data to the adaware Threatwork Alliance and become a security volunteer of this global community, activate ThreatWork Alliance. To enable/disable theThreatWork Alliance feature, proceed through the steps listed below:
Step 1: On the left navigation menu, click App Management. The App Management screen opens.
 <
<
Step 2: In the ThreatWork Alliance block, you will see the ThreatWork Alliance feature already enabled. To visit the ThreatWork Alliance official page, click the Visit the ThreatWork Alliance Page link under the ThreatWork Alliance block.
While having one antivirus program is a must for every computer to stay protected against various kinds of malware and viruses, using two is strongly not recommended.
There are several reasons why: the two antivirus programs running together could slow down your computer, they might identify each other as a virus, they will try either to block or kill each other, they will fight over viruses found, etc. It could lead to file corruption or other conflicts and errors that make your antivirus protection less effective or nor effective at all.
If you wish to download adaware antivirus 12 and already have another antivirus software installed on your PC, we strongly recommend to remove or at least disable the other antivirus as it can cause a conflict.
If you don't want to remove/disable another antivirus program installed on your PC, you have an option to install adaware antivirus 12 as a second line of defense (installation in a compatible mode) where no drivers will be installed. If any adaware antivirus drivers were installed earlier, they are removed. It allows you to use the Scan Computer option only. Please remember, if one or more incompatible antivirus programs are installed on your PC, running these programs alongside with adaware antivirus may generate conflicts and errors.
On the Adapter Settings dialog, you can specify whether adaware antivirus should block the connection between your system and another computer.
To access the Adapter Settings dialog, on the Advanced Settings screen, click the Manage button under the Adapter Settings block.
Here you can see the adapter(s) found on your PC.
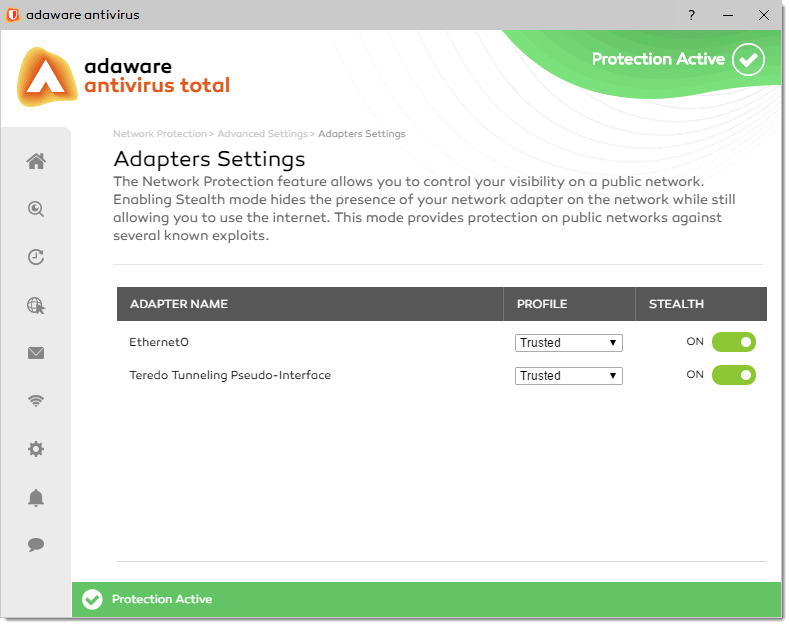
For each adapter the following information is displayed:
- Adapter Name - the name of the adapter.
- Profile - the profile type your adapter belongs to.
- Stealth - whether you can be detected by other computer.
To configure the Stealth Mode, single click the slider to switch between two positions. The green color stands for Enabled, which means that the Stealth Mode is on. Your computer is invisible from both the local network and the Internet. The grey color represents the Disabled status, i.e. the Stealth Mode is off. Anyone from the local network or the Internet can detect your computer.
By default, the Stealth Mode is on.
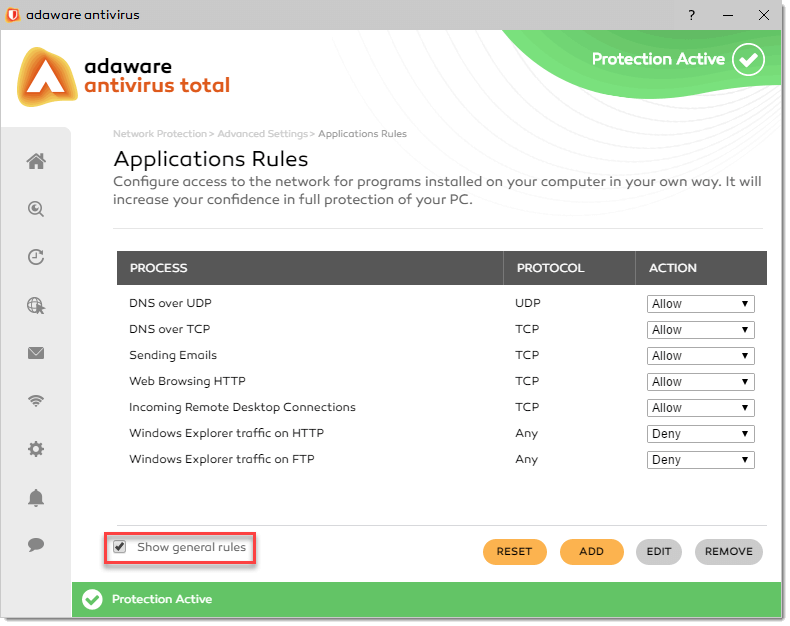
Whenever an application makes a request for Internet or network access, the Network Protection feature allows or denies this request based upon the rules specified for that application. Each individual rule contains instructions that determine whether the application should be allowed or blocked; which protocols it is allowed to use; which ports it is allowed to use and so forth.
The Network Protection uses a set of rules to filter data transmitted to and from your system. The rules are grouped into 2 categories:
- General Rules. Rules that determine the protocols over which the communication is allowed. A default set of rules that provides an optimal protection is used. You can edit the rules by allowing or denying connections over certain protocols.
- Application Rules. Rules that determine how each application can access network resources and the Internet.
General rules
Certain protocols are used whenever data is transmitted over the Internet.
By default, general rules aren't displayed when opening Network Protection. To display these rules, select the Show General Rules checkbox on the bottom of the Application Rules window:
 <
<
The default rules are displayed. To edit the rule action, select a corresponding Allow or Deny drop-down menu option.
-
DNS over UDP.
Allow or deny DNS over UDP. By default, this type of connection is allowed.
-
DNS over TCP.
Allow or deny DNS over TCP. By default, this type of connection is allowed.
-
Sending emails.
Allow or deny sending e-mails. By default, this type of connection is allowed.
-
Web Browsing HTTP.
Allow or deny HTTP web browsing. By default, this type of connection is allowed.
-
Incoming Remote Desktop Connections.
Allow or deny other computer' access over Remote Desktop Connections. By default, this type of connection is allowed.
-
Windows Explorer traffic on HTTP.
Allow or deny HTTP traffic from Windows Explorer. By default, this type of connection is denied.
-
Windows Explorer traffic on FTP.
Allow or deny FTP traffic from Windows Explorer. By default, this type of connection is denied.
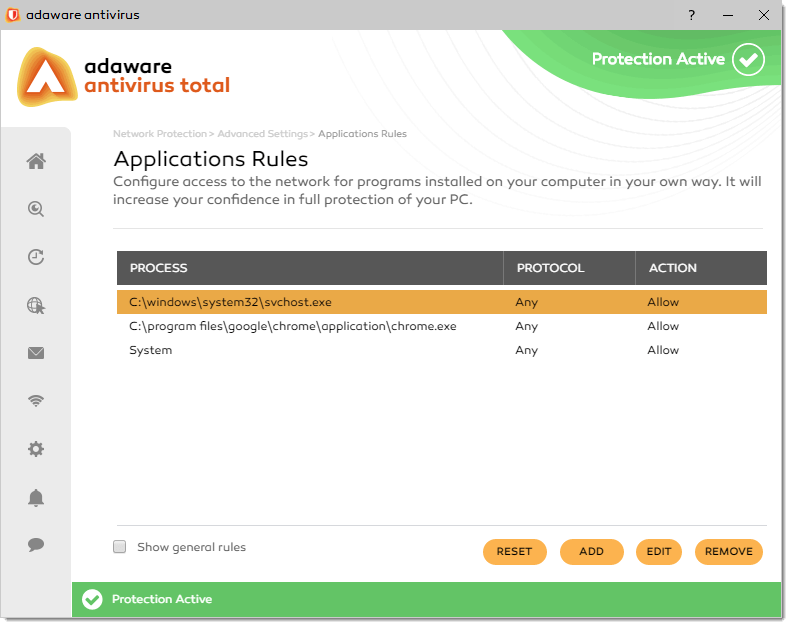
Application rules
To view and manage the rules controlling applications' access to network resources and the Internet, open the the Application Rules dialog first:
1. On the Advanced Settings dialog, click the Manage button under the Application Rules block.
Here you can reset, add, edit or remove rules to be applied to the applications installed on your PC.
To define a new rule for an application, click the Add button. With the Add Rule dialog displayed, specify the following parameters:
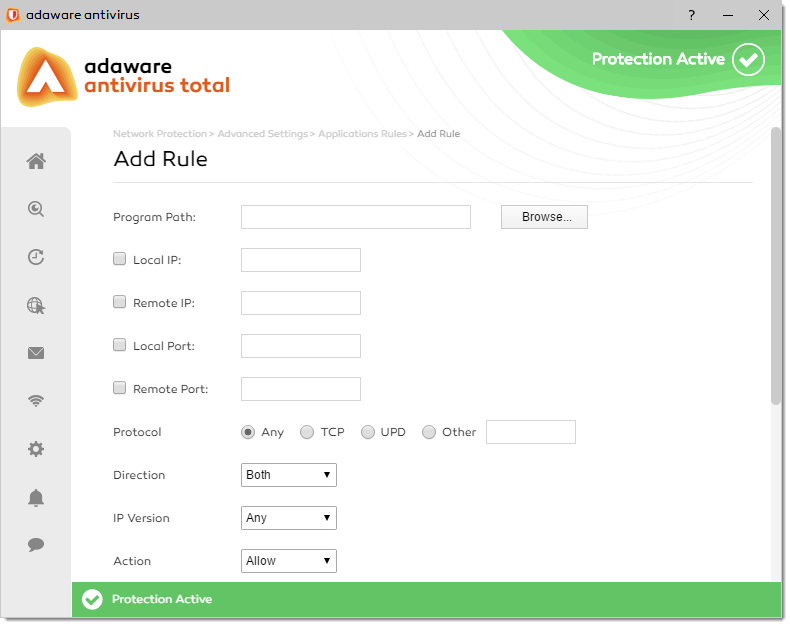
- Program Path. Click the Browse button and select the application the rule applies to.
- Local IP. Specify the source address of the connection attempt. You are allowed to type only one value.
- Remote IP. Specify the destination address of the connection attempt. Several values separated by comma can be entered here.
- Local Port. Specify the port that the application must be attempting to send data through. Several values separated by comma or a range of values using dashed can be entered here.
- Remote Port. Specify the port on the remote entity that the application must be attempting to send to. Several values separated by comma or a range of values using dashed can be entered here.
-
Protocol. Specify the protocol that the application must be attempting to use when sending or receiving packets of data:
- Any. Select this checkbox if you want the rule to apply to all IP protocols.
- TCP. Select this radio button to enable two hosts to establish a connection and exchange streams of data. TCP (Transmission Control Protocol) guarantees data and guarantees delivery of packets in the same order they have been sent.
- UDP. Select this checkbox to use User Datagram Protocol that is an IP-based transport designed for high performance. It is often used by games and other video-based applications.
- Other. Select this checkbox if you want the rule to apply to a specific protocol and indicate a number to represent this specific IP protocol (other than TCP and UDP).
-
Direction. Select the direction of the monitored network activity:
Outbound. The rule applies only for the outgoing traffic.
Inbound. The rule applies only for the incoming traffic.
Both. The rule applies in both directions.
- IP Version. Select a suitable IP address format: IPv4, IPv6, or Any.
- Action. The action the Network Protection feature takes when the conditions of the rule are met. Select Allow or Deny.
Once the parameters have been specified, select one of the four profiles the rule will apply to:
- Trusted
- Home/Office
- Public
- Untrusted
A profile is a way to group the network adapters. For example, on a machine with six network adapters one may belong to group #1 (which we can label "Home/Office network rules") and the rest can belong to group #2 (which can be labeled "Public network rules").
Adapter grouping is useful as it allows certain rules to be immediately applied for any selected adapters.
For example, you can create various rules for home networks and for public networks using different profiles. If a new adapter is added (like a newly connected WI-FI adapter), you can choose to apply one of those sets of rules to this new adapter.
The profile types were added to enhance the user experience. No action will be taken unless you specify it. One adapter can have several profiles selected. Once you apply one of the four profiles to an adapter, all the rules assigned to this profile become active for this adapter.
To save your parameters, click the Save button.
To edit a rule, select it in the application rules list, and then click the Edit button. With the Add Rule dialog displayed, modify the parameters previously set, and click the Save button.
To delete a rule, select it in the application rules list, and then click the Remove button.
To remove the current set of rules and restore the default ones, click the Reset button.
Tray notifications and balloons inform you on the status of the adaware antivirus application. They provide information for example on launching the scanning or on threat detected, or on malicious application blocked, etc.
Notifications and balloons display for the following events:
-
Threat detected! Threat has been detected during the scanning process. Click the View details link to navigate to the Scan Computer screen.

-
Threat disinfected! Threat is detected in real time. The balloon notifies you that adaware anitivirus applied the Disinfect action to the threat found. The full path to the threat found is provided in a tooltip.

-
Failed to disinfect. The balloon notifies you that an attempt to remove the infected file has failed. The full path to the infected file is provided in a tooltip.
-
Threat quarantined! Threat is detected in real time. The balloon notifies you that adaware anitivirus applied the Quarantine action to the threat found. The full path to the threat found is provided in a tooltip.

-
Failed to quarantine. The balloon notifies you that an attempt to move the infected file into Quarantine has failed. The full path to the infected file is provided in a tooltip.
-
Quick Scan Started. The balloon notifies you that the scheduled Quick Scan has started. Click the View details link to open the Scan Computer screen showing you the scanning process being performed.

-
Full Scan Started. The balloon notifies you that the scheduled Full Scan has started. Click the View details link to open the Scan Computer screen showing you the scanning process being performed.

-
Context Menu Scan Started. The balloon notifies you that the Context Menu Menu Scan has started. Click the View details link to open the Scan Computer screen showing you the scanning process being performed.

-
Exploit blocked. The Active Virus Control has blocked an exploit. Exploit is a malicious program or some code that takes an advantage of a security hole (i.e. a vulnerability) in an application or system, so that an attacker can use it for their benefit. The balloon shows the type and path of the blocked threat.

-
Malicious application blocked. The Active Virus Control has blocked a malicious program. The balloon shows the type and path of the blocked threat.

-
Special offer. A special offer is available. Click the View details link to navigate to the Home screen.

-
Notification from adaware. The adaware antivirus application alerts you when a specific event occurs. For example, updates are available, or the program is about to expire, etc. Click the View details link to navigate to the Home screen.

To access Notification Center, on the left navigation menu, select the Notification Center option.
Alternatively, on the them Status Bar, located at the bottom of the adaware antivirus window, click the Details link (available only if at least one problem/issue has been detected).
With the Notification Center screen displayed, you can see a list of problems detected.
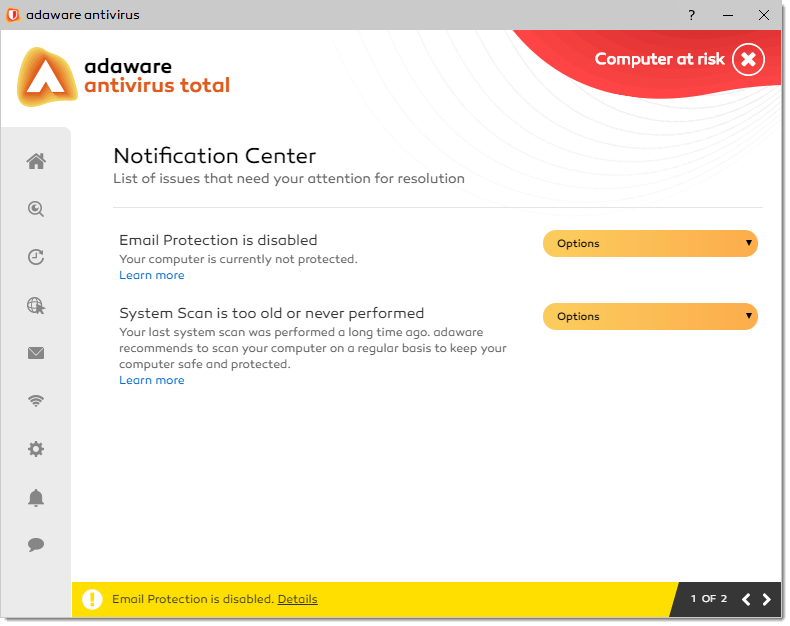
To view the details about the particular problem found, click the Learn more link underneath the particular problem. You will see the screen with the detailed description of the problem and recommendations on how to solve it.

Use the drop-down combo box to apply one of the following actions on the item:
- Fix It Now (recommended). Select this option to fix the problem immediately. Afterwards, the problem is not available in the list.
- Remind me later. Select this option to clear the problem. You will be reminded about it after 48 hours.
- Ignore (not recommended). Select this option to move the item to the Ignored List.
You can apply appropriate actions from the Notification Center screen as well.
To get information about the adaware antivirus program:
- On the caption panel, click the Question icon.
With the dialog displayed, learn more about the program.

To close the dialog, click the Close button in the top-right corner of the dialog or just click outside the dialog.
Tray application (on your Windows taskbar, right-hand bottom corner of your monitor) is a software application that is installed together with adaware antivirus. It informs you if adaware antivirus is running or not. Orange indicates that the the service is running and fully functional. Grey indicates that the service is currently disabled.
To access the main adaware antivirus user interface (the "GUI"), double-click the tray application icon in the system tray.
To access the context menu of adaware antivirus, right-click the tray application icon.
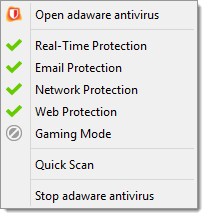
The context menu includes the following options:
Open adaware antivirus
Opens the adaware antivirus application.
List of adaware antivirus features
Disables/enables adaware antivirus features. Click the required feature to disable/enable it. A set of features available in the list depends on your current version of adaware antivirus.
Quick Scan
Runs a Quick Scan.
The Quick Scan command is replaced by one of the following statuses depending on a process being currently performed:
- Scanning...: when a scan of any type is being performed.
- Scan Paused: when a scan of any type is paused.
- Cleaning...: when a selected action is applied to threat(s) found.
- Clean Paused: when a cleaning procedure is paused.
- See Scan Result: when a scan of any type is finished and threats are found.
Clicking a status on the tray context menu opens the Scan Computer screen.
Stop adaware antivirus
Stops the adaware antivirus service.
The Stop adaware antivirus command is replaced by the Start adaware antivirus command. Click this option to start the adaware antivirus service.
If you want to manage ignored notifications, proceed through the steps listed below:
- On the left navigation menu, click App Management. The App Management screen opens.
- In the Ignored Notifications block, click the Manage button.

With the Ignored Notifications screen displayed, you can see the a list of actions you have ignored working with Notification Center.
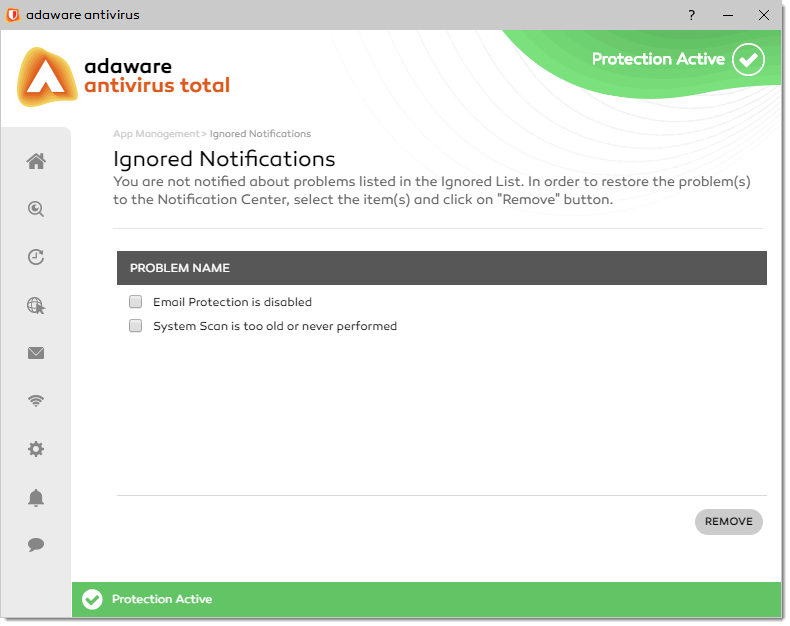
To remove an action from the list and restore it to the Notification Center, select the check box it corresponds to and then click Remove.
User Interface and Operation
You can operate the adaware antivirus application via the following program interface elements:
-
Caption panel
On the panel, you can see the program name. Use the Minimize and Close buttons to minimize or hide the application to the taskbar, or close the application. You may use the caption panel to move an application window by grabbing the title bar and dragging.
-
Header
On the panel, you can see the program version and status bar indicating that computer is protected, at risk or threats are detected.
-
Left menu
The menu's purpose is to supply a common housing for the main application features. Click the menu element of your choice to access the required menu section.
-
Breadcrumbs
Breadcrumbs are a navigation and effective visual aid that indicates your location within the application’s hierarchy. It allows you to keep track of your locations within adaware antivirus.
Breadcrumbs reduce the number of actions you need to take to get to a higher-level screen, and they improve the findability of the application's sections and screens.
-
Content pane
Once you click the menu element of your choice on the left navigation menu, a corresponding menu section opens.
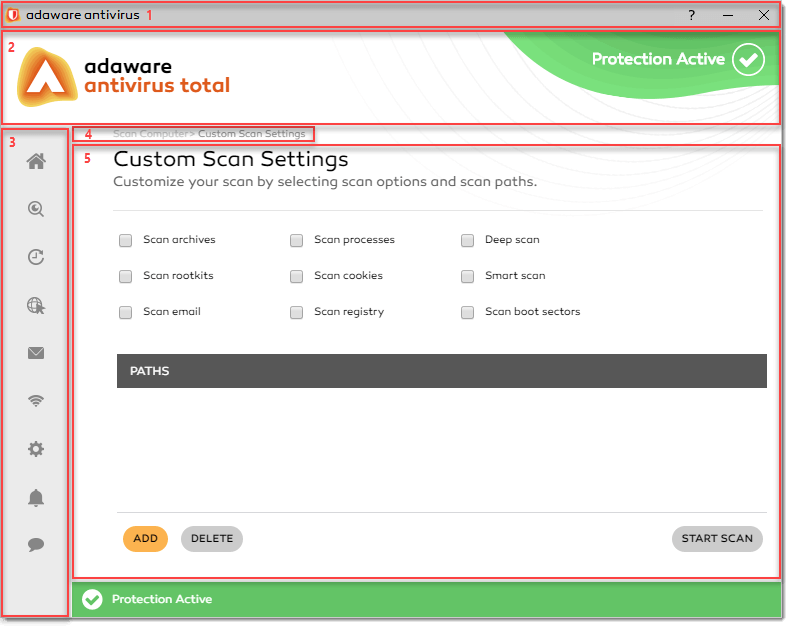
You may install adaware antivirus only on computers running the following operating systems:
- Windows 10 (32- & 64-bit)
- Windows 8, 8.1 (32- & 64-bit)
- Windows 7 with Service Pack 1 (32- & 64-bit)
- 4.5 oder eine höhere Version des Microsoft Windows Installers wird für die Installation von Adaware Antivirus benötigt.
Your computer must meet the following system requirements in order to run the application effectively.
Minimum system requirements:
- 1 GB free space (at least 800 MB on the system drive)
- Dual Core 1.6 GHz processor
- 1 GB (32-bit) or 2 GB (64-bit)
Recommended system requirements:
- 2 GB free space (at least 800 MB on the system drive)
- Intel CORE Duo (2 GHz) or equivalent processor
- Memory (RAM): 2 GB
Integrates with:
- Yahoo Messenger 9 and higher
- Skype 6.3 and higher
- Internet Explorer version 10 and higher
- Mozilla Firefox 14 and higher
- Google Chrome version 20 and higher
- Thunderbird 14 and higher
- Outlook 2007, 2010, 2013
- Outlook Express and Windows Mail on x86
Trusted source for online security since 1999, Adaware antivirus frequently receives high detection scores from independent testers and automatically stays up-to-date with the latest threats. The latest version of Adaware antivirus has the same great features with a simplified user interface, straightforward settings menu, and an enhanced user experience.
adaware antivirus is an easy-to-use and effective anti-malware and antivirus product comprising high-class technologies which give you an unequaled protection against various kinds of viruses and malware.
Key Features:
 On-Demand Scanner (free, personal, pro, total)
The on-demand scanner offers users multiple options for antivirus scanning:
- Quick Scan performs a basic scan of your computer's active processes to detect malicious activity.
- Full Scan thoroughly checks all of your computer’s processes and files.
- Custom Scan allows you to decide which locations in your computer are scanned for malicious activity.
- Automated scan allows you to schedule the antivirus scanner to work around your schedule, including the frequency, type of scan and time of day.
Automatic definition updates download the latest malware information to ensure your protection against the latest threats. The program checks for new definition files every hour but the frequency can be adjusted to conserve system and network resources.
 Real-Time Protection (free, personal, pro, total)
Real-Time Protection works in the background to protect your computer as you work or play, scanning files for potential malicious activities. Built-in smart scan technology checks previously-scanned files with less frequency to conserve system resources.
 Active Virus Control (personal, pro, total)
The Active Virus Control feature scans and prevents malicious processes in real time. It monitors the actions of applications at the process level to identify possible malware activities.
 Email Protection (pro, total)
The Email Protection feature is intended for users who use desktop email clients such as Microsoft Outlook and store the emails on their local computer. This feature scans all incoming and outgoing emails to ensure they have not been compromised by malware and protects users accordingly, logging and deleting malicious attachments before they have a chance of infecting your computer. Additionally, this feature notifies users of spam messages. When the Email Protection feature is enabled, emails are marked with a footer indicating that they have been scanned by adaware antivirus.
 Web Protection (personal, pro, total)
The Web Protection feature warns you if the site you’re trying to visit is suspected of phishing or distributing malware. This provides an additional layer of protection beyond the built-in defenses of your web browser. The Web Protection feature consults multiple databases for the latest phishing and malware links to provide up-to-date protection against the latest online threats.
 Network Protection (pro, total)
Network Protection enables a firewall which stops hackers from infiltrating your home network and accessing your files. The default mode of Network Protection closes ports which are potential entry points to infiltrate your home network. Additional options allow adaware antivirus to monitor all process changes and adapters on your network for alterations made by malicious programs. An optional stealth mode allows your PC to become invisible on its network.
 Parental Control (total)
Parental Control is an extension of the Web Protection feature which allows parents to filter online content according to their child’s age and unique needs. Parents can consult a categorized list which allows them to use preset groups of banned websites based on their child’s age range. Alternately, parents can create their own categories of websites to block and initiate a custom filter.
Parental Control is a feature of adaware antivirus that helps parents protect their children while they use the Internet. When you turn on parental controls, you can restrict what content can be accessed.
Restrict access by category:
Parents can restrict access by selecting or deselecting items from the list of web categories for each group (Adults (21 and over), Young Adults (under 21), Teen (under 18), Children Permissive (under 12), and Children Restrictive (under 12). If the check box next to the category is selected, then it is not allowed. By deselecting a specific category, parents can allow it for the selected group.
Exclusion list
Parents can create an exclusion list to allow a specific web site to be accessed, if a category it belongs to is blocked.
You can turn on Parental Control feature to block adult oriented content someone can download or view on your computer or laptop. It’s a good web filtering for parents looking to protect their kids from inappropriate or adult websites at home by settings content restrictions.
Enable parental control
To turn on Parental Control feature, proceed through the steps listed below:
Step 1: On the left navigation menu, select Web Protection.
Step 2: On the Web Protection screen, enable the slider next to Parental Control.
Configure parental control
To configure Parental Control settings, proceed through the steps listed below:
Step 1: On the Web Protection screen, click Advanced Settings under Parental Control block.
Step 2: On the Parental Control Settings screen, use the drop-down combo box to choose a predefined set to block specific content.
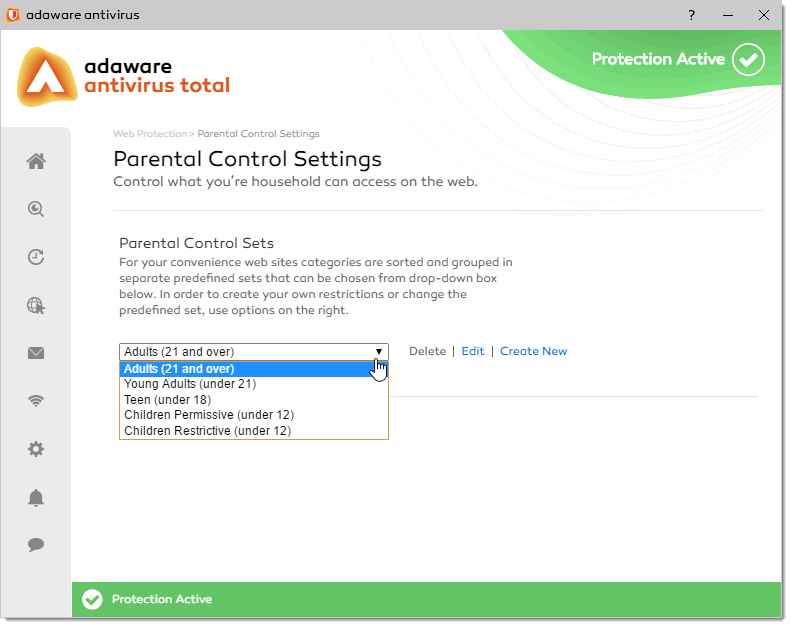
If you try to access blocked content on a computer with active Parental Control filtering, you will get a similar page below. It means the Parental Control is working perfectly.
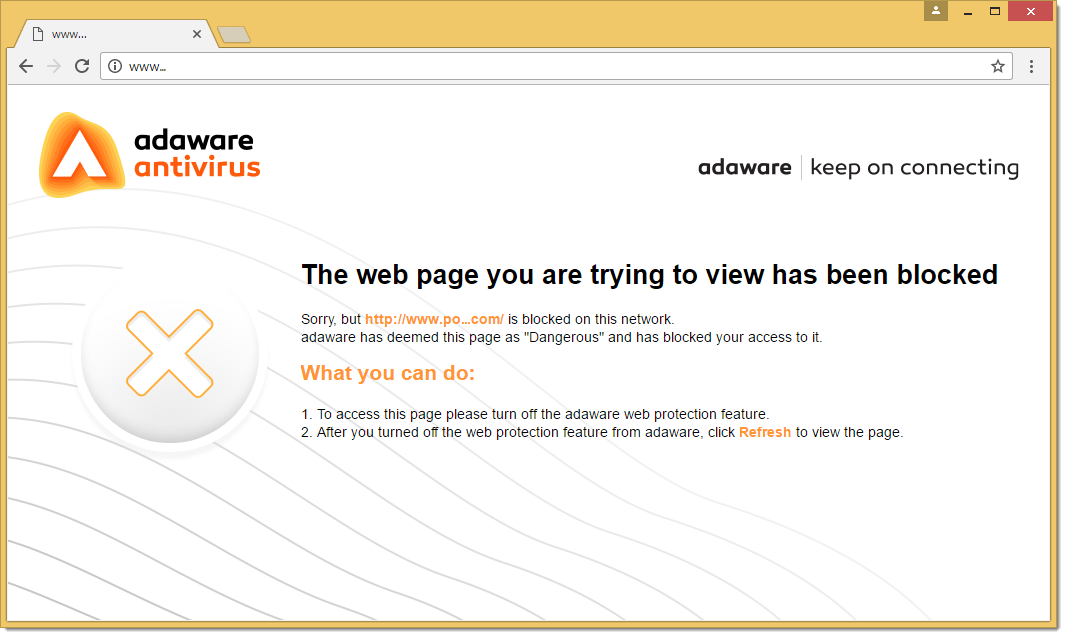
Our two-way firewall complements and enhances the protection offered by your typical router and provides more robust security by monitoring which applications are attempting to send data out (outgoing traffic).
To set and configure the Network Protection feature (available in Pro and Total versions), proceed through the steps listed below:
-
On the left navigation menu, select the Network Protection option. The Network Protection dialog opens.
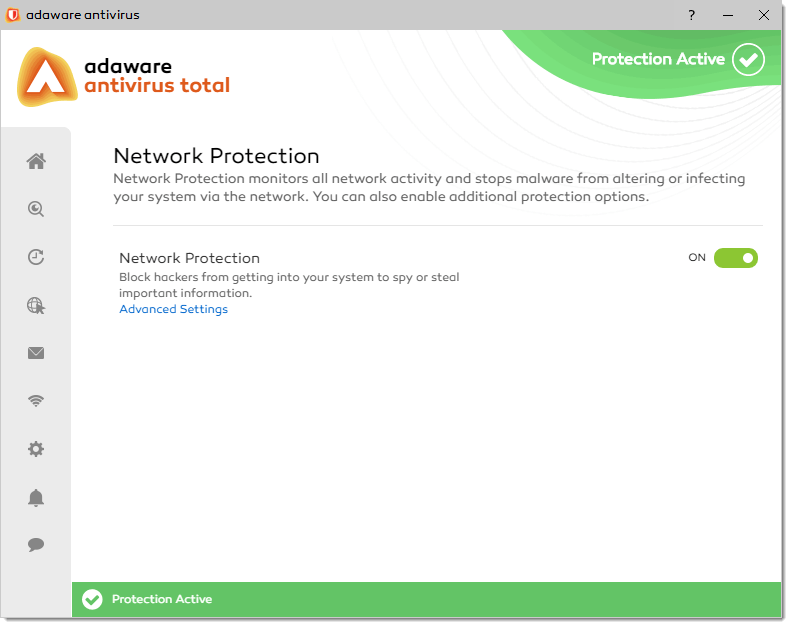
Alternatively, on the Home screen, click the slider next to Network Protection to enable/disable the feature.
By default, the Network Protection feature is enabled. Single click the slider to switch between two positions. The green color stands for Enabled, which means that the Network Protection security service is active and fully functional. The grey color represents the Disabled status, i.e. the service is deactivated.
If adaware antivirus has detected any incompatible software, you need to install additional components to enable Network Protection. To do this, click the slider next to the Network Protection feature and continue installing additional components.
-
To get access to the advanced configuration options of the Network Protection feature, click the Advanced Settings link.
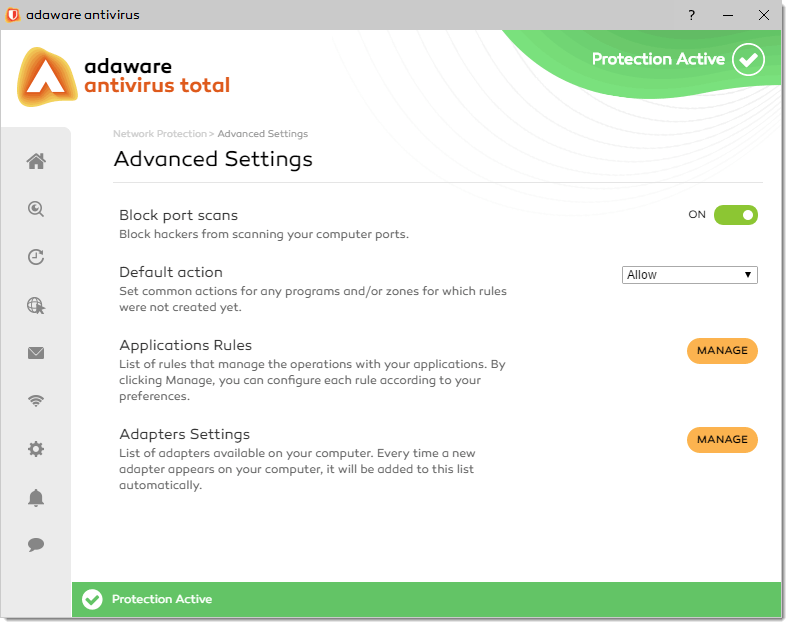
Here you can manage the following settings:
- Block port scans. Click the slider to enable/disable blocking hackers from scanning your computer ports.
-
Default action. Use the drop-down combo box to select Allow, Deny or Prompt actions that are performed by the Network Protection feature on detecting a network connection attempt. Allow and Deny actions are applied to any program, if no rule has been created yet. If the Prompt action is selected, any application attempting to access the network/Internet will trigger a prompt requesting to allow or deny access for this application. Rules for any application are automatically created when selecting Allow or Deny. Once selected, no prompt will appear the next time the application accesses the network/Internet.
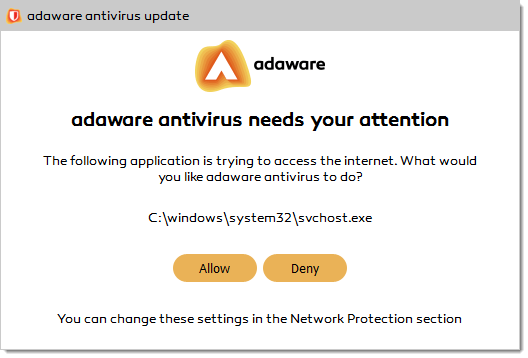 The Default action applies only to applications that are not covered by the General Rules.
- Application Rules. Click the Manage button to manage the application rules by which installed applications can access network resources.
- Adapter Settings. Click the Manage button to manage adapter(s) available on your PC.
The Email Protection feature (available in Pro and Total versions) allows you to shield your emails from malware, spam, and viruses filtering inbound messages. Once the Email Protection feature is on, your email is automatically scanned behind the scenes.
The Email Protection dialog allows you to configure the following components:
- Email Protection
- Safe list
- Protection Level
To adjust the Email Protection feature, follow these steps:
-
On the left navigation menu, select the Email Protection option. The Email Protection dialog opens.
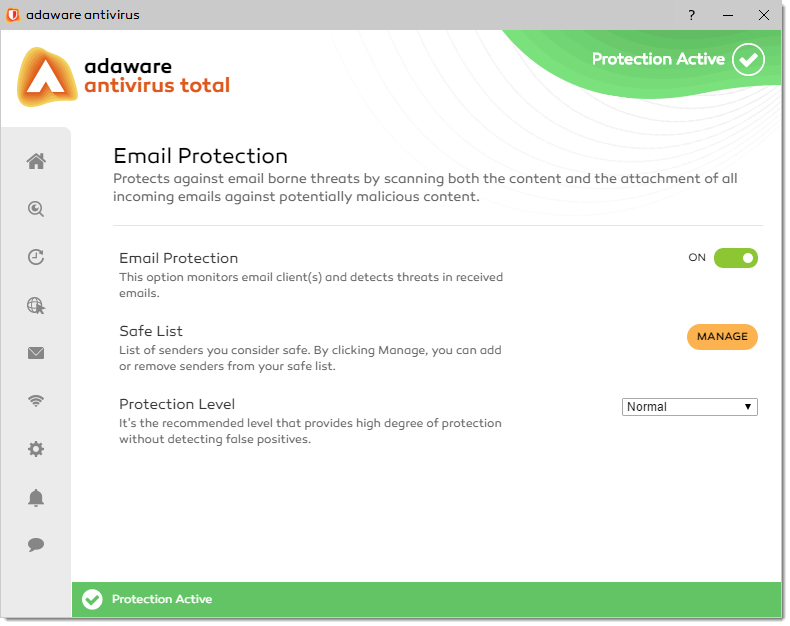
Alternatively, on the Home screen, click the slider next to Email Protection to enable/disable the feature.
By default, the Email Protection feature is enabled. Single click the slider to switch between two positions. The green color stands for Enabled, which means that the Email Protection security service is active and fully functional. The grey color represents the Disabled status, i.e. the service is deactivated. If you do not have a good reason to deactivate the service, we strictly recommend that you keep the Email Protection feature turned on.
If adaware antivirus has detected any incompatible software, you need to install additional components to enable Email Protection. To do this, click the slider next to the Email Protection feature and continue installing additional components.
Safe list
Safe List is a list of senders from which you want to receive messages, even if their content is similar to spam.
To add email addresses to the Safe List, proceed through the steps listed below:
- On the Email Protection screen, in the Safe List block, click the Manage button.
-
With the Manage Safe List dialog, click the Add button.
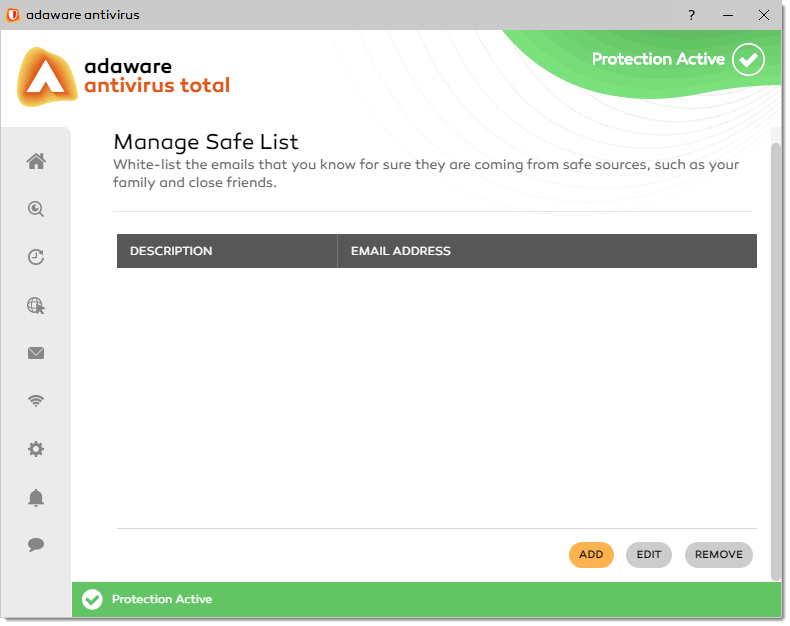
-
With the Add Senders to Safe List screen, type the description and email address in the corresponding text fields.
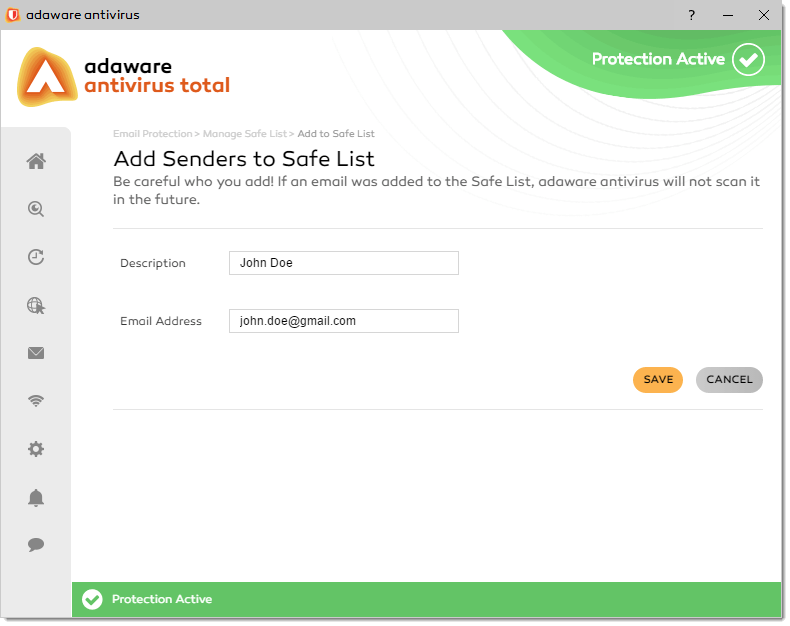
-
Click the Save button. The email address appears in the list.
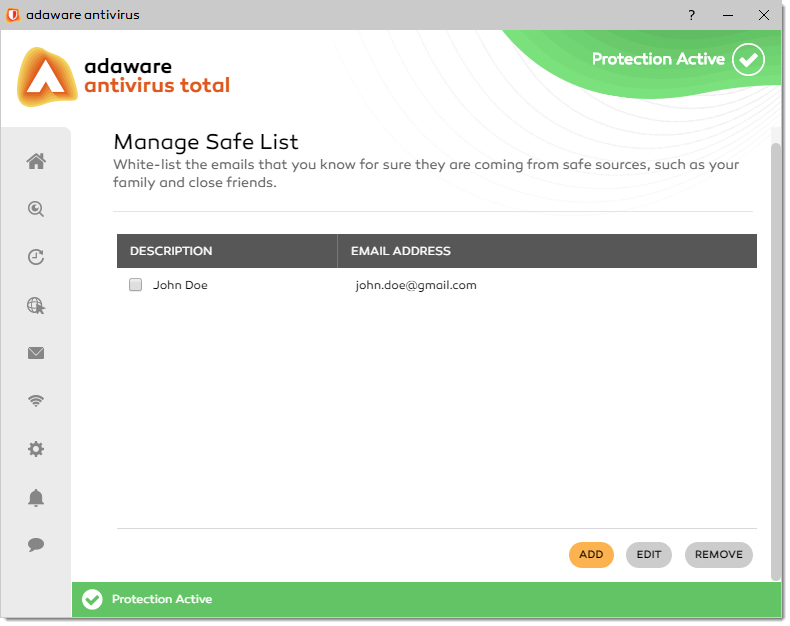
To remove the record from the list, select the check box corresponding to this record, and then click the Remove button.
To edit the record in the list, select the check box corresponding to this record and then click the Edit button. With the Add Senders to Safe List dialog displayed, modify the description and/or email address, and click the Save button.
Protection level
Use the Protection Level drop-down combo box to select a level of the protection:
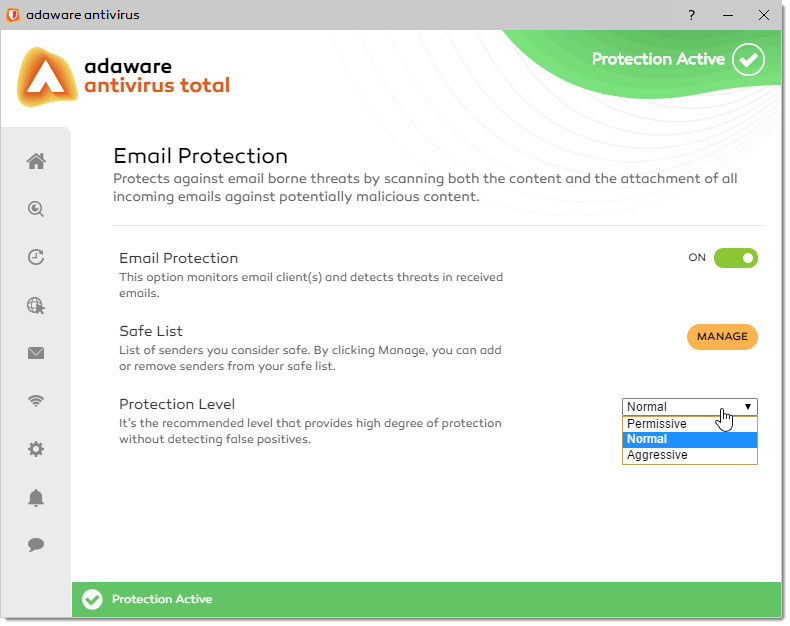
- Aggressive. Provides maximum possible spam detection that guarantees complete protection against malicious content. However, there is a risk of false positives occurrence (detection of valid email messages as spam). Use this protection level if you work in a non-secure environment.
- Normal. This is the recommended protection level that provides a high degree of protection without detecting false positives. This is also the default setting.
- Permissive. Provides the lowest level of protection (not recommended) that increases risk of false negatives. Use this protection level if you work in a well secured environment only.
Supported e-mail clients and protocols
>The Email Protection is available only for e-mail clients configured to receive e-mail messages via the POP3 protocol with no SSL function enabled (non-encrypted port 110). This means the following:
- E-mail messages received via web-based e-mail services (such as Yahoo, Gmail, Hotmail or other) are not filtered for viruses/spam by adaware antivirus.
- If your e-mail client is configured to receive e-mail messages using other protocol than POP3 (for example, IMAP4), the Email Protection will not check them for spam and viruses.
POP3 is one of the most widely used protocols for downloading e-mail messages from a mail server. If you do not know what protocol your e-mail client uses to download e-mail messages, ask the person who configured your e-mail client.
The web is the number one source of malware and threats which get more varied and sophisticated every day. The Web Protection feature allows blocking the latest web threats and keep you safe from malicious sites. It implies an Internet filter and parental control for your computer.
Step 1: On the left navigation menu, click Web Protection. The Web Protection screen opens.
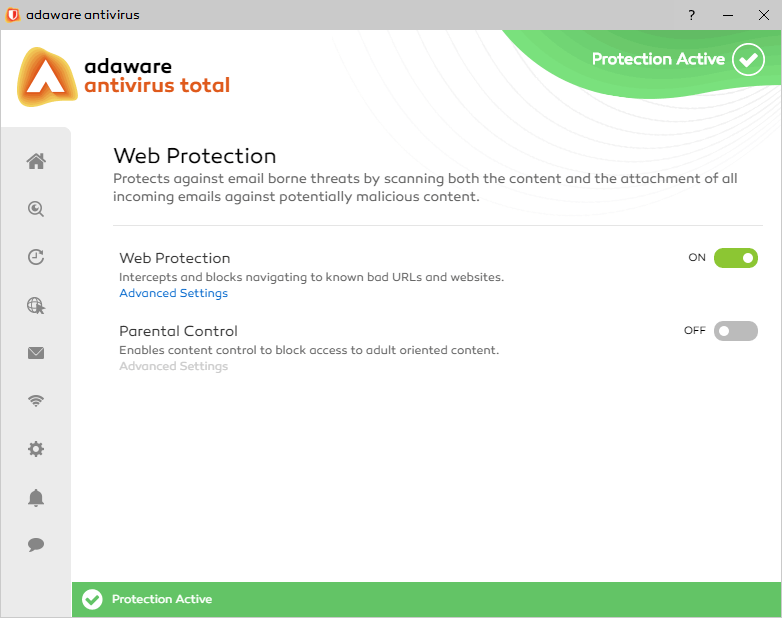
By default, the Web Protection feature is enabled. Single click the slider to switch between two positions. The green color stands for Enabled, which means that the Web Protection security service is active and fully functional. The grey color represents the Disabled status, i.e. the service is deactivated. If you do not have a good reason to deactivate the service, we strictly recommend that you keep the Web Protection feature turned on.
You can also enable/disable the Web Protection feature from the Home tab.
Step 2: To enable the Parental Control feature, click the slider next to Parental Control. You can disable the Parental Control feature separately. With that, the Web Protection feature remains enabled. See What is Parental Control and what does it do and How to Customize Parental Control for more details and examples.
Step 3: Click Advanced Settings to access additional settings for Web Protection.
Anti-Phishing
This feature identifies phishing content contained in websites and protects you from attempts to acquire passwords, banking data and other information by fraudulent websites masquerading as legitimate ones.
Malware Scanner
This feature enables monitoring and blocking malicious content that may access your computer while browsing in the Internet.
Malware URLs
This feature blocks access to the websites that are included in the adaware database of unsafe URLs. To configure advanced settings for the Malware Scanner feature, in the Malware Scanner block, click Advanced Settings. Here you can view and manage the following settings:
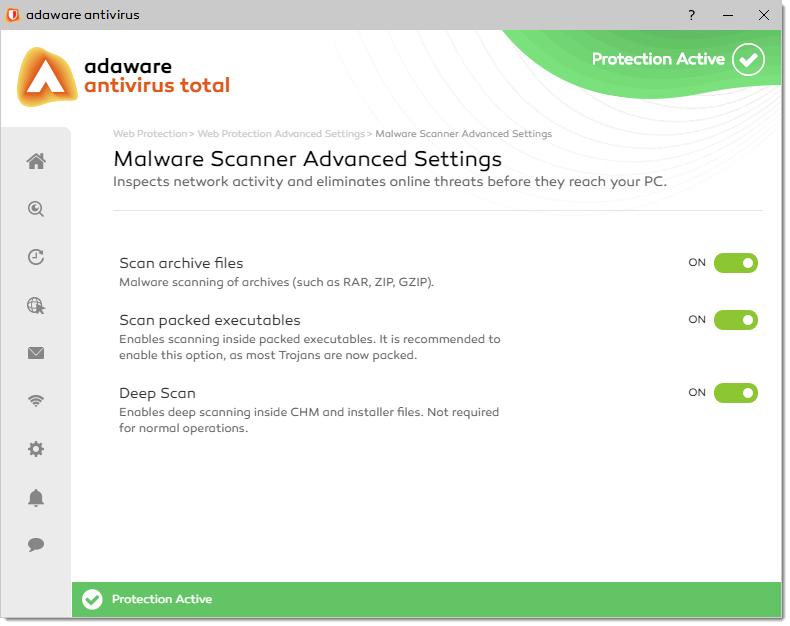
Scan archive files
Scans and detects viruses inside archives.
Scan packed executables
Scans and detects malicious code inside packed executables.
Deep Scan
Performs thorough checking inside CHM and installer files.
For your convenience, we have sorted and grouped web sites categories in separate predefined sets. To learn more about these sets, see the table below:
|
|
Adults |
Young<br> Adults |
Teens |
Children<br> (permissive) |
Children<br> (permissive) |
|---|---|---|---|---|---|
|
|
21+ |
18-21 |
12-18 |
0-12 |
0-12 |
Adult/Sexual |
|
|
x |
x |
x |
Sexual/Porn (hardcore porn) |
|
|
x |
x |
x |
Nudity |
|
|
x |
x |
x |
Intimate Apparel/Swimsuits |
|
|
x |
x |
x |
Sex Education (including Abortion) |
|
|
x |
x |
x |
Personals/Dating/Romance |
|
|
x |
x |
x |
Art & Entertainment |
|
|
|
|
|
Arts (comic books) |
|
|
|
|
|
Comedy/Humor and Jokes |
|
|
|
|
|
Entertainment - Books, Theatre |
|
|
|
|
|
Music/Radio/TV/Movies/Film |
|
|
|
|
|
Streaming Media |
|
|
|
|
|
Business |
|
|
|
|
|
Business (the website is for a business) |
|
|
|
|
|
Investing/Stocks/Financial Services |
|
|
|
|
|
Job Search/Careers |
|
|
|
|
|
Computers |
|
|
|
|
|
Advertisements and pop-ups |
|
|
|
x |
x |
Anonymous Proxies |
|
|
x |
x |
x |
Computing, General |
|
|
|
|
|
Internet/Net Services |
|
|
|
|
|
Image (photo) & Video Search |
|
|
|
|
|
Search Engines |
|
|
|
|
|
Second Source Search Engine |
|
|
|
|
|
Cultures/Society |
|
|
|
|
|
Cult and Occult |
|
|
x |
x |
x |
Home & Garden |
|
|
|
|
|
Fashion/Style |
|
|
|
|
|
Food and eating |
|
|
|
|
|
Gay/Lesbian |
|
|
x |
x |
x |
Government/Politics & Political Activist Groups |
|
|
|
x |
x |
Kids & Teens |
|
|
|
|
|
Real Estate |
|
|
|
|
|
Religion |
|
|
|
|
x |
Retirement/Seniors |
|
|
|
|
|
Drugs/Alcohol/Tobacco |
x |
x |
x |
x |
x |
Illegal Drug use and promotion |
x |
x |
x |
x |
x |
Alcohol use and promotion |
x |
x |
x |
x |
x |
Tobacco use and promotion |
x |
x |
x |
x |
x |
Education |
|
|
|
|
|
Colleges/Universities |
|
|
|
|
|
Education/General |
|
|
|
|
|
Libraries x Museums |
|
|
|
|
|
Reference/Homework & Studying |
|
|
|
|
|
Science |
|
|
|
|
|
Games |
|
|
|
|
|
Gambling |
|
|
x |
x |
x |
Game Media/Game Playing |
|
|
|
|
|
Fraud/Illegal Activities/Cheating |
x |
x |
x |
x |
x |
Botnets/Phishing/Malware/Key loggers and Monitoring |
x |
x |
x |
x |
x |
Malicious/Dangerous websites |
x |
x |
x |
x |
x |
Fraud/Illegal Activities |
x |
x |
x |
x |
x |
Hacking |
x |
x |
x |
x |
x |
Hate Speech/Discrimination |
x |
x |
x |
x |
x |
Suicide Promotion |
x |
x |
x |
x |
x |
Vulgar or Obscene language |
x |
x |
x |
x |
x |
Health & Medical |
|
|
|
x |
x |
Health & Medical |
|
|
|
x |
x |
News |
|
|
|
x |
x |
News |
|
|
|
x |
x |
Recreation/Hobbies |
|
|
|
|
|
Recreation/Hobbies |
|
|
|
|
|
Hunting/Fishing |
|
|
|
|
|
Motor Vehicles |
|
|
|
|
|
Shopping |
|
|
|
x |
x |
Classified/Auctions |
|
|
|
x |
x |
Shopping |
|
|
|
x |
x |
Social Networking & Personal Web Content |
|
|
|
|
|
Blogs/Forums/Chat/Web based message board & Newsgroups |
|
|
|
x |
x |
Personal Web Content/Hosting Sites |
|
|
|
|
|
Web based e-mail |
|
|
|
x |
x |
Web based Instant Messaging (IM and IRC) & Web Cams |
|
|
x |
x |
x |
Sports |
|
|
|
|
|
Sports |
|
|
|
|
|
Violence |
x |
x |
x |
x |
x |
Violence |
x |
x |
x |
x |
x |
Weapons Promotion or Sale |
x |
x |
x |
x |
x |
Misc |
|
x |
x |
x |
x |
Domain For Sale |
|
x |
x |
x |
x |
Under Construction/Parked Domains |
x |
x |
x |
x |
x |
Link Lists/Link Farms |
x |
x |
x |
x |
x |
adaware antivirus allows you to modify predefined sets and to create your own sets for blocking access to the sites of certain categories. With that, you can create an exclusion list to allow a specific website to be accessed, if a category it belongs to is blocked.
To create a new set, proceed through the steps listed below:
Step 1: On the left navigation menu, select Web Protection.
Step 2: On the Web Protection screen, enable the slider next to Parental Control.
Step 3: In the Parental Control block, click Advanced Settings.
Step 4: On the Parental Control Settings screen, click Create New.
Step 5: With the message box displayed, type a name of new set, and then click the Save button.
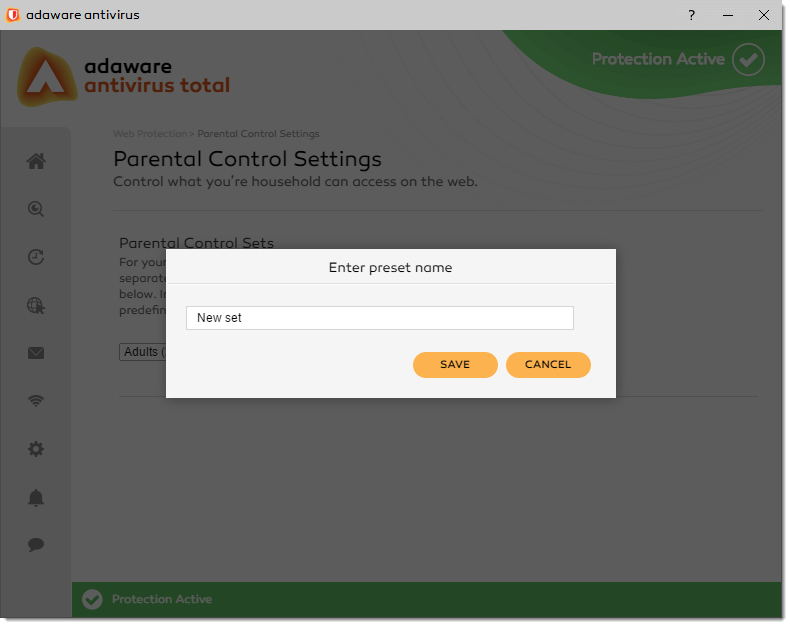
Step 6: With the Parental Control Sets screen, in the Manage Set categories block, select check boxes to specify subcategories.
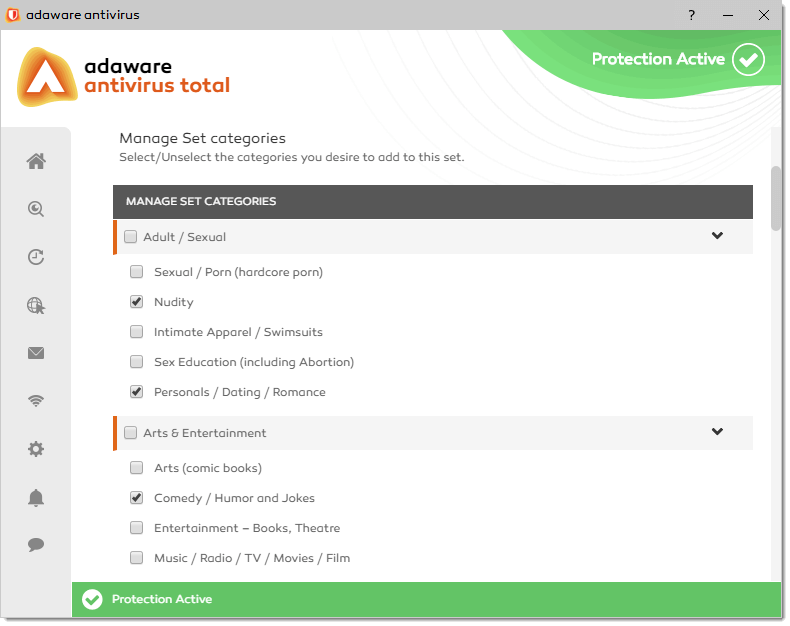
If you want to change the name of the predefined set:
Step 1: In the Set Name block, click the Change button.
Step 2: With the message box displayed, type a new name, and then click the Save button.
You are not allowed to change the names of the predefined sets.
To add a specific web site to the Exclusion List, do the following:
Step 1: In the Exclusion List block, click Manage exclusion list. The Exclusion List screen opens.
Step 2: Click the Add button to add the URL of the website from blocked category that you want allow access.
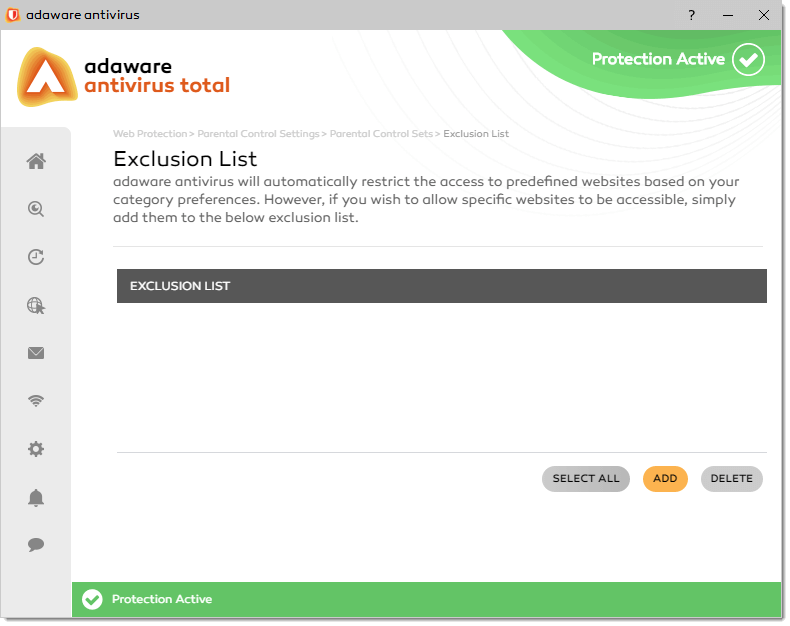
Step 3: With the dialog box displayed, type the URL and then click Add.
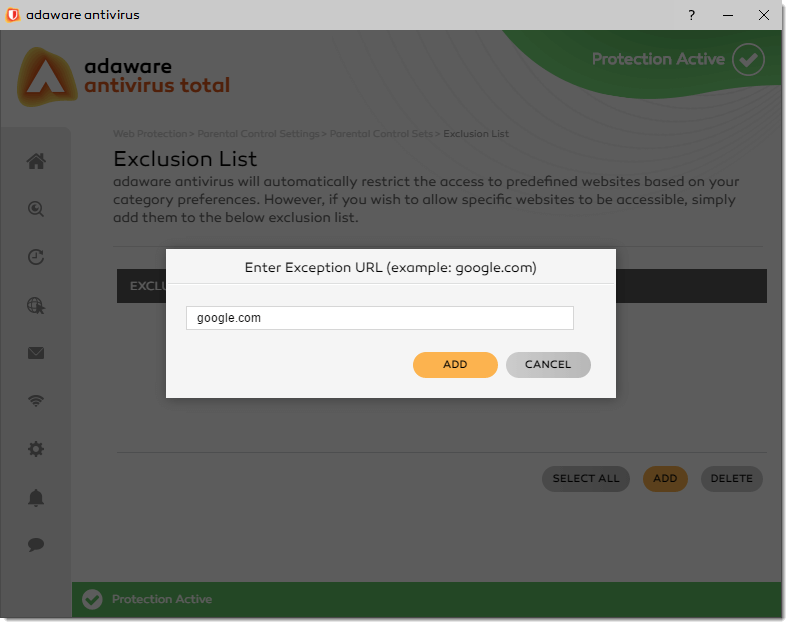
To remove the URL from the list, select the check box it corresponds to, and then click Delete.
You can remove the user-defined set by following these steps:
Step 1: On the Web Protection screen, click the slider next to Parental Control.
Step 2: In the Parental Control block, click Advanced Settings.
Step 3. In the drop-down combo box, select the set you want to remove, and then click Delete.
You are not allowed to delete predefined sets.